
Hand Pies from the Yawning Portal:
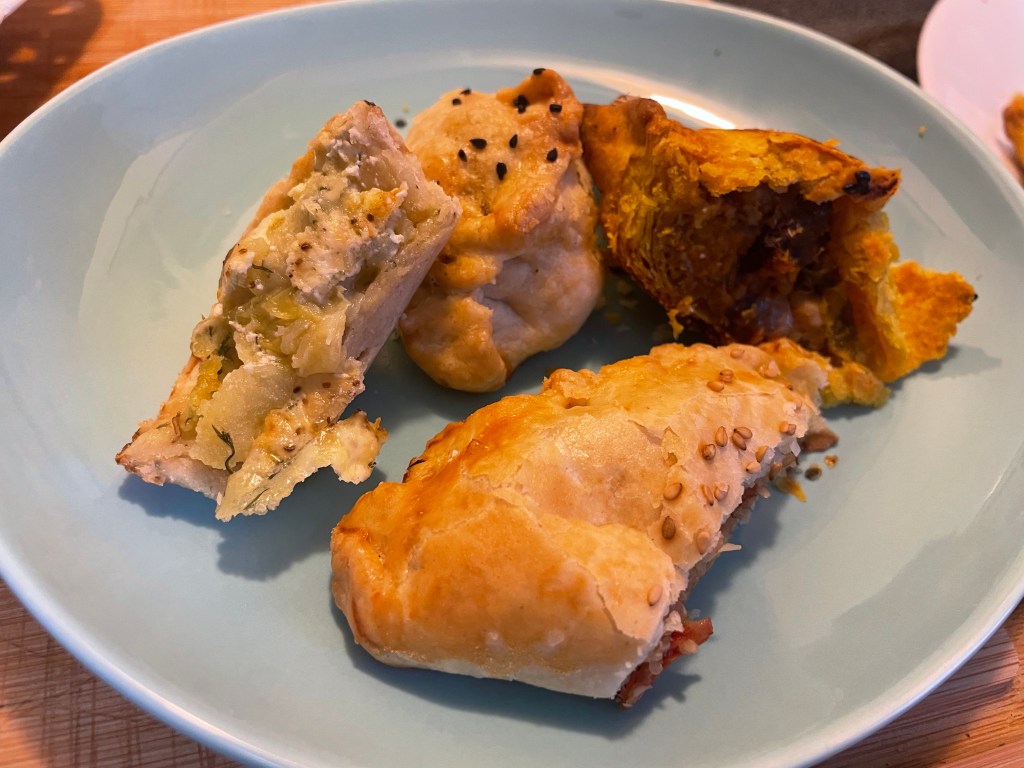
It is most important to keep up one’s strength when embarking on a search for a missing Floon. Thus far Eliana is the only one of the party who keeps her mind firmly on important practical details. Like regular snacks. Thank the Lady that the Yawning Portal makes highly portable and delicious pastries; so convenient for the adventurer in the midst of a troubling investigation!
I grew up in Zimbabwe, where many culinary cultures mixed but all tended firmly carnivorous (whenever it was available and affordable, beef was unquestionably king). The British colonial food legacy lingered in, among other things, pies. Many many pies. All meaty. I have happy memories of snacking on everything from the grocery store cold-case pork pie, its 2cm thick anemic crust and solid brick of mystery filling sternly frowned upon by all parents, to the delicately crisp and golden puff pastry encasing savory beef stew that was available at most cafes, to the home-made delight that was chicken and mushroom pasties made by a friend’s mother for our camping trips.
Despite all of these good meaty memories, I decided to challenge myself by coming up with three vegetable pastries for Elie to enjoy. So, of the four recipes below, only one is a meat pie. Hopefully this results in a more interesting mix of textures and flavors.
My favorite pastry recipe is from Savory Pies: Delicious Recipes for Seasoned Meats, Vegetables, and Cheeses baked in Perfectly Flaky Crusts by Greg Henry. This book is full of really delicious pie ideas (pie-deas?) but I most often head to its introductory chapter where the author helpfully offers great pastry recipes. His basic flaky pastry is richly buttery in flavor and tender in texture. And difficult to mess up. My only adjustment is the amount of water used. When I follow the original recipe, which calls for 90ml/1/3 cup water in total, I get a crumbly mess. For whatever reason, my particular flour/butter/climate combination is thirsty!
This pie dough can be used for all of the pie and pasty recipes below:
Basic Flaky pastry:
Ingredients:
390g/2 3/4 cup all-purpose flour
10g/2tsp kosher salt
225g/1 cup/2 sticks of very cold European style/high fat butter (unsalted), cut into 1cm/1/2 inch cubes
2-3 ice cubes
190ml/2/3cup cold water, plus a splash more as needed
Variations:
For the squash and chickpea pasties, add 5g/1tsp turmeric and 5g/1tsp smoked paprika to the pastry dough.
Fort the creamy cabbage and potato pies, add 5g/1tsp each of onion powder and freshly ground black pepper to the pastry dough.
Method:
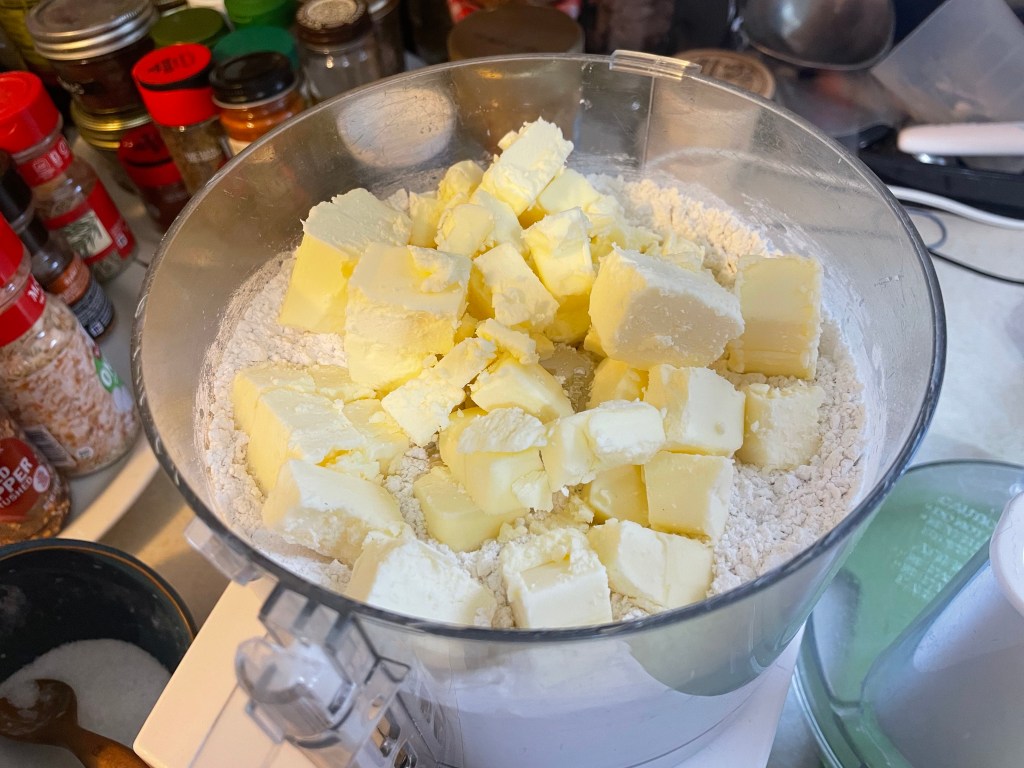
- Pulse flour and salt in a food processor until combined. This is also the time to add any spices or herbs to the mix if you want to make variations on the basic pastry dough.
- Add the cubed cold butter to the food processor and pulse 10-12 times until it is fragmented unevenly into the flour. You are looking for a pebbly mixture of visible butter chunks the size of a lima bean intermixed with smaller buttery crumbs.
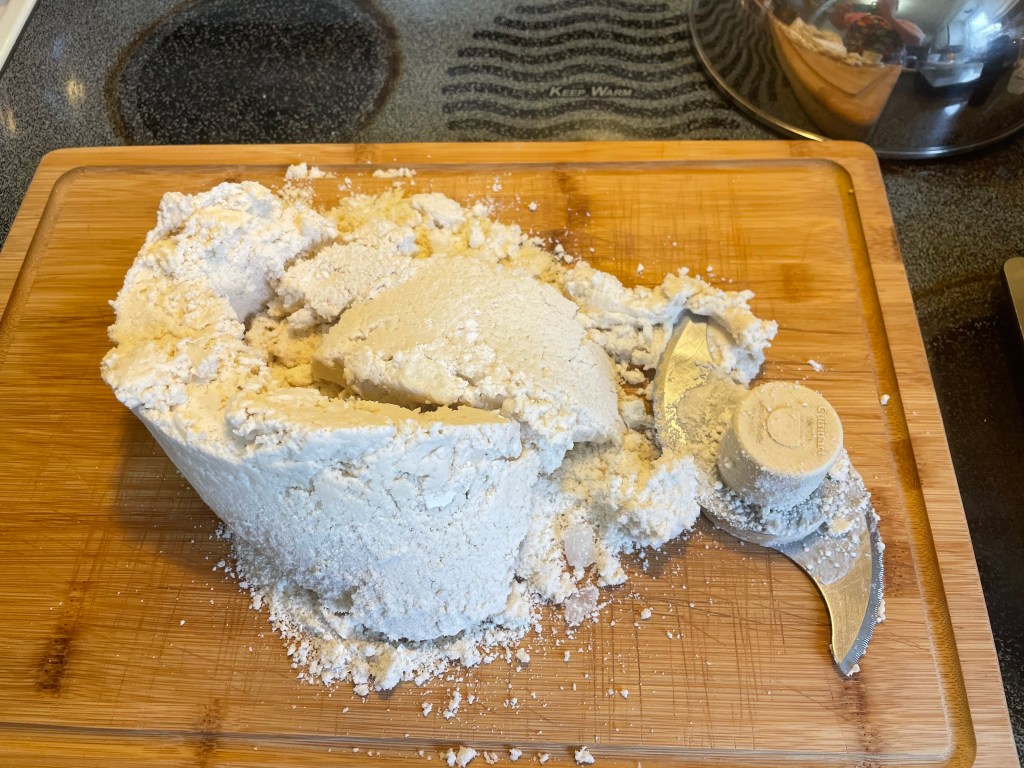
- Wedge your 2-3 ice cubes into the food processor’s feed tube and, with the processor running, slowly pour up to 190ml of water over the ice in the tube. Start by pouring in 80ml with brisk confidence. Now slow down! But do not panic. After about 90ml of water are in, continue more carefully. Pour in only a small splash at at time and stop the machine when the dough just holds together in one clump and starts to come away from the sides of the food processor bowl. You may not use all of the water or you may need a splash or two more than is listed here. This will depend on your flour and how much moisture it absorbs. I find that I reliably use the entire 190ml/2/3 cup and get an nice pliable but not overly wet dough to work with.
- Remove the dough from the food processor and give it a few gentle kneads on your counter. Make sure that there are no super crumbly and dry areas – these may need to be sprinkled with a few more drops of icy cold water. Or, if you find that the dough is very sticky and wet, add a small dusting of flour. You are looking for a soft and pliable dough, not dry but not so wet that it leaves bits of itself behind on your fingers when you touch it. Form the dough into a ball, wrap well or place in a sealed container, and put into the refrigerator to rest for at least an hour before use. It will survive in the refrigerator for 2-3 days without ill effect. It can also very successfully be frozen for 1-3 months. Thaw, still wrapped, in the refrigerator overnight.
This pastry recipe can be converted to a vegan pie dough if you substitute the butter for 225g of dairy-free block margarine or vegetable “lard”.


Roasted squash, sweet potato, and chickpea pasties.
Makes 16 pies.
Ingredients:
1 batch of basic flaky pastry or vegan pastry
700g/1.5lb butternut squash, peeled and cut into 1 inch cubes
500g/1lb sweet potato (1 large), peeled and cut into 1 inch cubes
120ml/1/2 cup olive oil, divided
10g/2tsp onion powder
Salt and pepper to taste
450g/15.5oz/1can chickpeas or 200g/7oz. dried chickpeas, soaked in cold water overnight
1 large onion, peeled and diced
2 large garlic cloves, peeled and minced
5g/1tsp smoked paprika
10g/2tsp Ras el Hanout spice
1.25g/1/4tsp cinnamon
5g/1tsp curry powder
2.5g/1/2tsp cumin
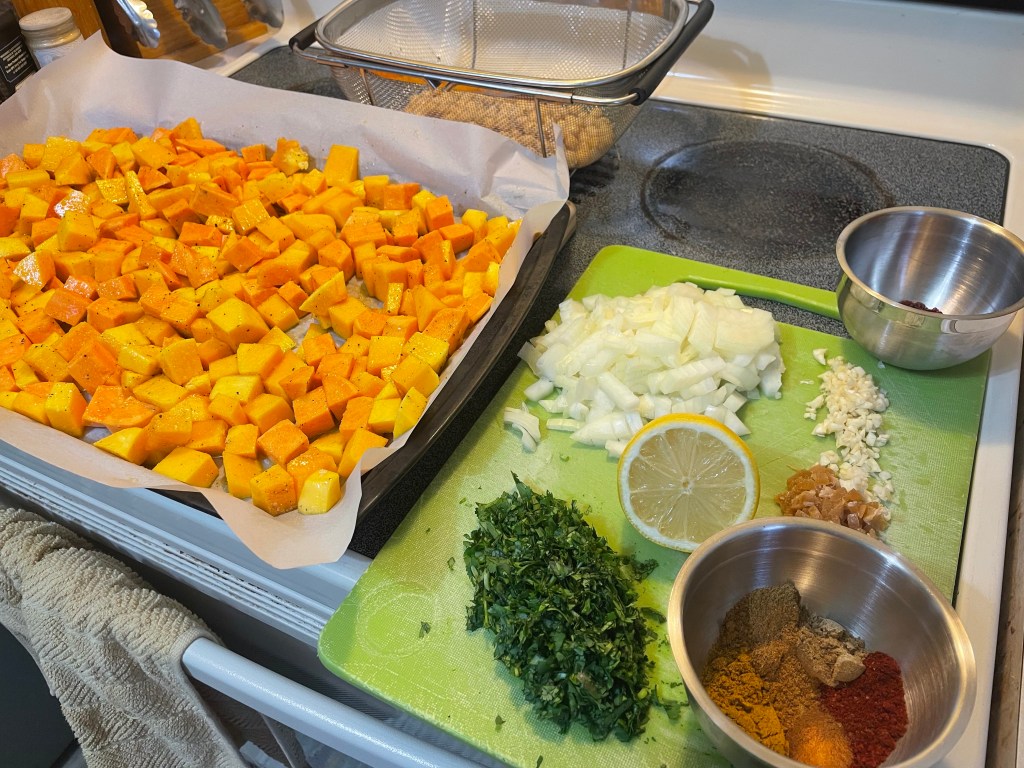
1 bunch/approximately 1 cup cilantro, finely chopped
60g/2tblsp dried barberries
30g/1tblsp preserved lemon, peel only, finely chopped
60ml/2tblsp fresh lemon juice
Method:
For the Filling:
- Preheat oven to 425 degrees Fahrenheit/220 degrees C.
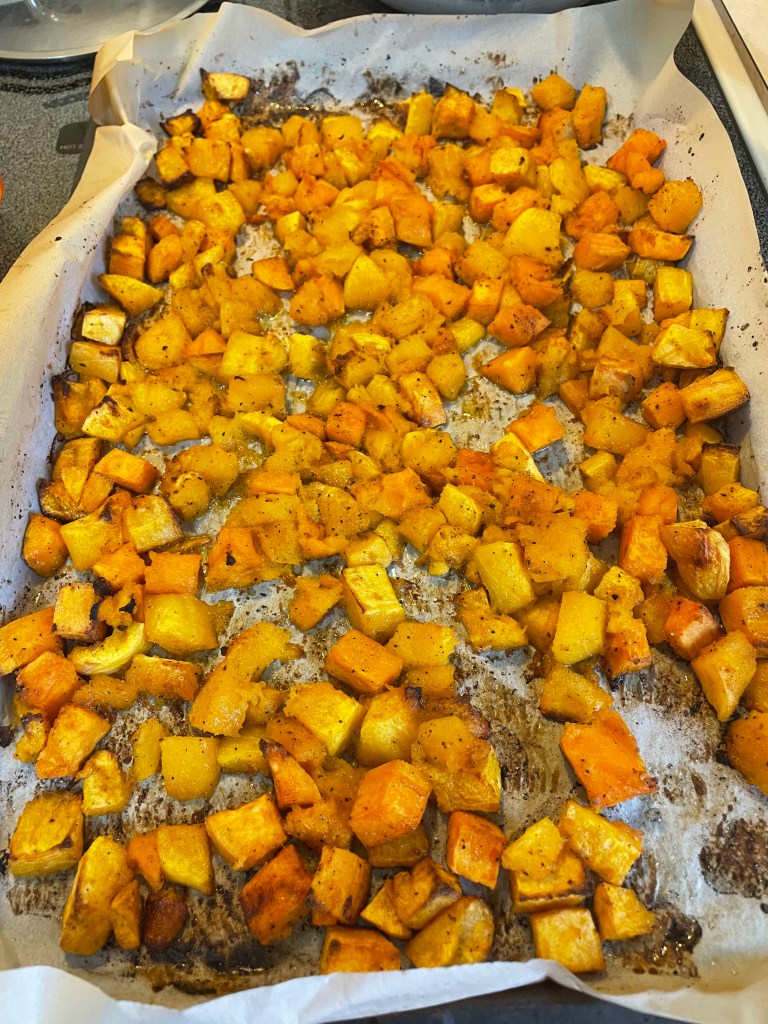
- I usually use the boxed, pre-peeled, pre-cut butternut squash for convenience (and safety). But, if this is not available (as it was not during the day when I was taking photos for this post), I will grumpily peel and clean an entire squash. This is a very anxiety-inducing experience – please be careful when attacking this dangerously impenetrable vegetable. Once you have triumphed over the squash, toss it and the sweet potato with onion powder, salt, pepper, and half of our olive oil. Strew the mixture on a parchment paper-lined baking sheet and place and bake in the middle of your oven for 45 minutes- 1 hour, or until fully cooked and beginning to turn caramelized and crispy in places. The exact timing will depend on how big you chopped your vegetables and how roasty-toasty you prefer your squash.
- Meanwhile, prepare your chickpeas. If you are using the canned product, simply drain into a sieve and rinse with cold water, then shake somewhat dry before use. If you have dried chickpeas, you will have to go back in time and soak them in cold water to cover overnight. Or, you know, plan ahead and get them soaking the night before. The next day, when they are all plump and have absorbed much of the soaking water, drain them, place them in a pot with 700ml/3 cups of stock (chicken broth, vegetable stock, dashi, bouillon cube dissolved in hot water – all are good), and simmer gently for 1 hour until the chickpeas are soft when authoritatively mashed with a fork. Drain prior to use (the resulting chickpea cooking liquid is a lovely thickened base for soups. So save this).
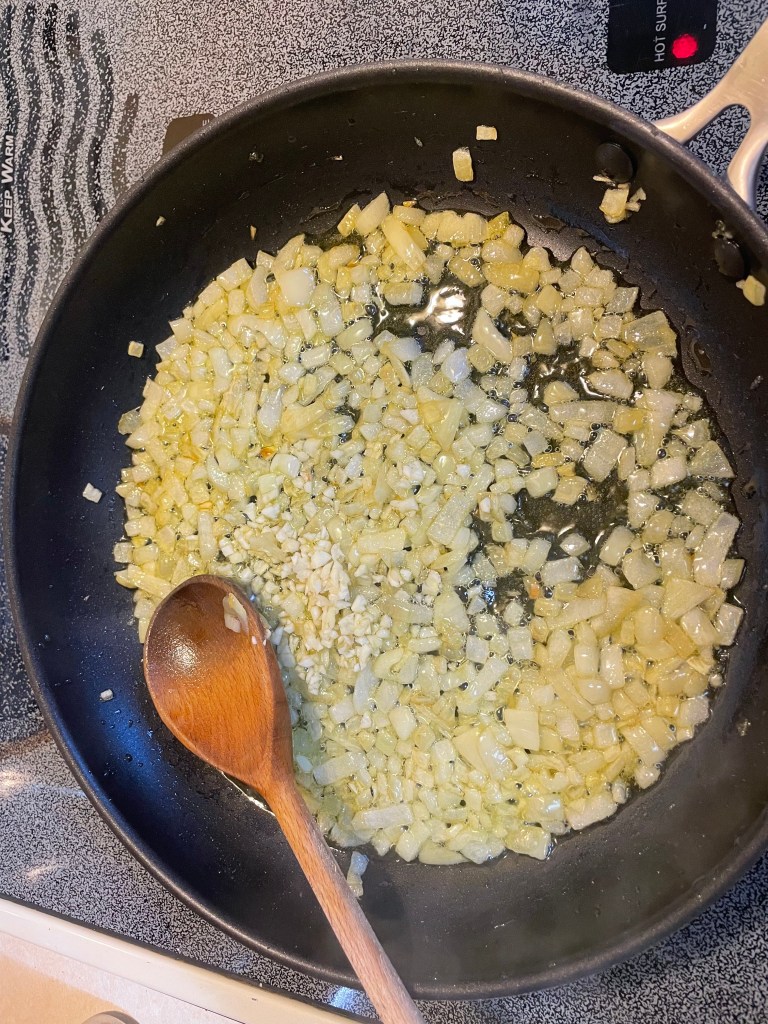
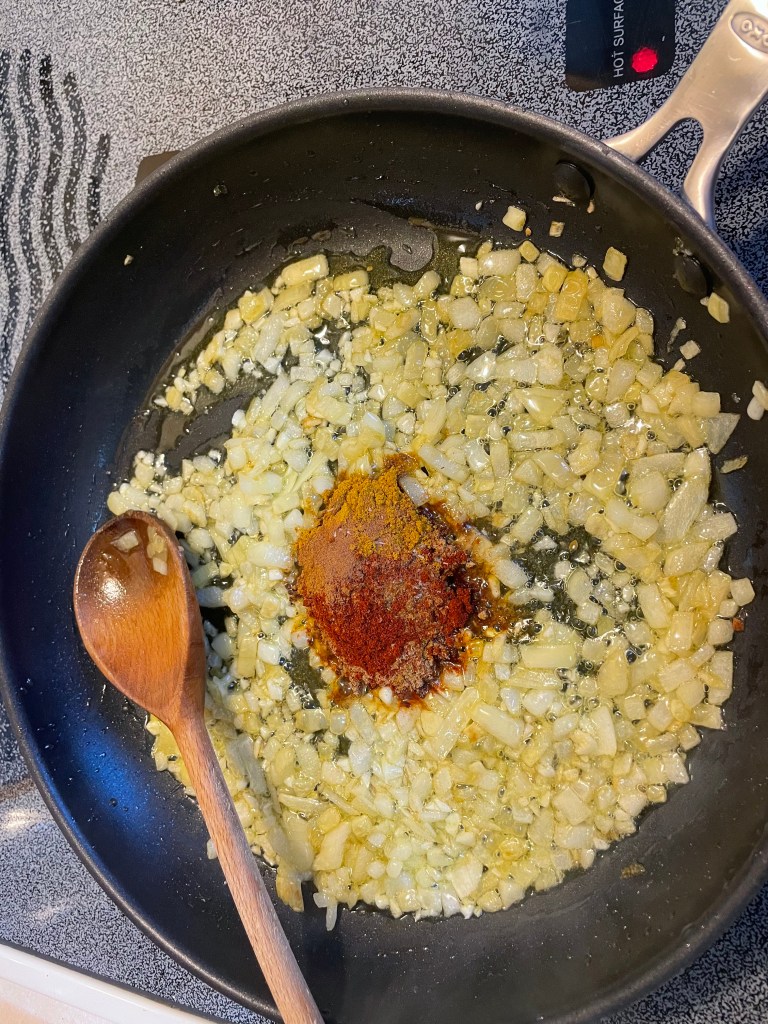
- Heat 30ml/1tbsp olive oil in a large sauté pan and fry the chopped onions over medium heat until glassy and starting to turn golden. This will take approximately 7-10 minutes but you can accelerate the process if you turn up the heat. In that case, be attentive and stir frequently as onions can go from fragrantly golden to distressingly bitter and burnt in moments.
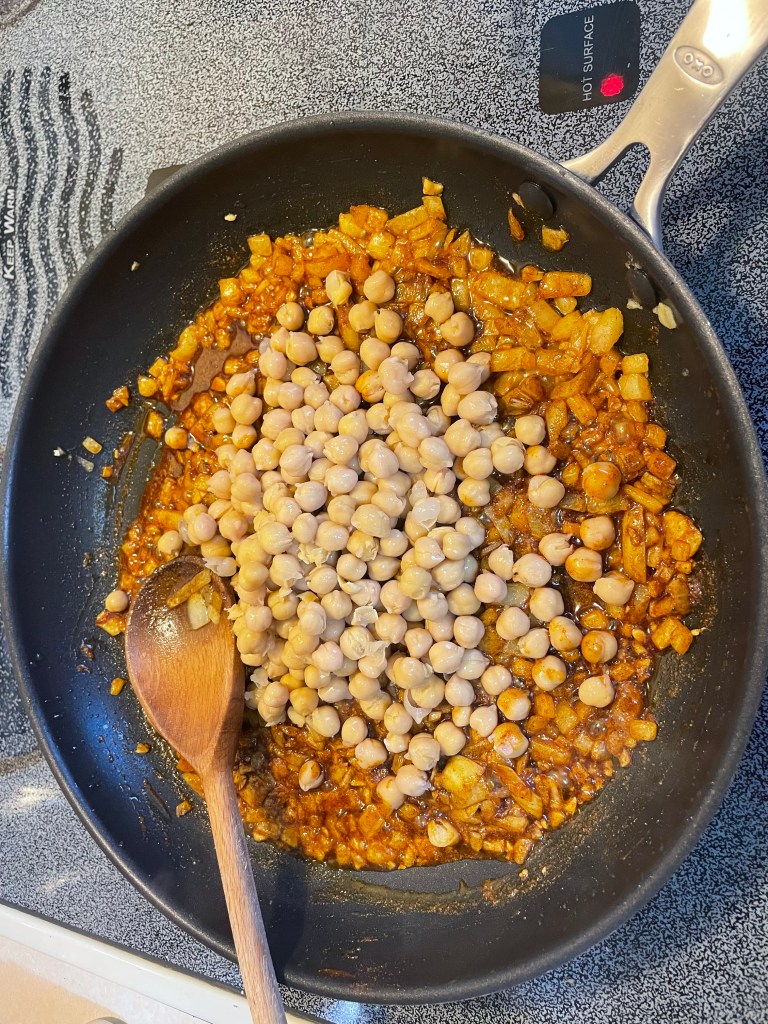
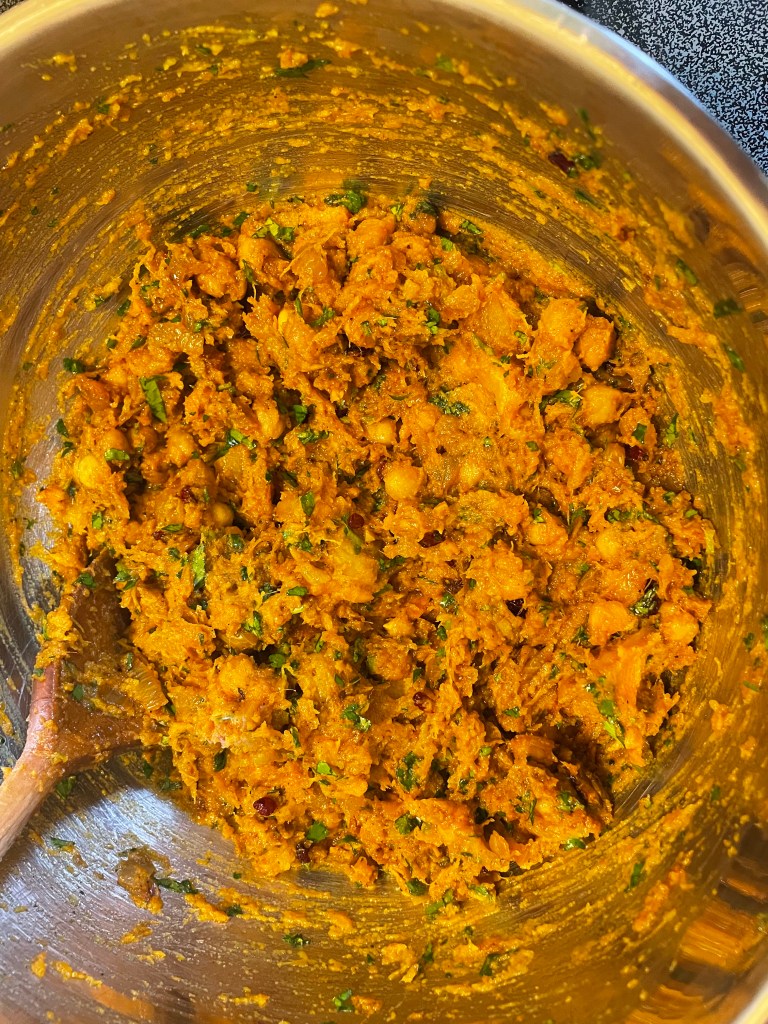
- Add minced garlic to the frying pan and heat until fragrant, 1-2 minutes. Then add paprika, Ras el Hanout spice, cinnamon, curry powder, and cumin and stir to bring everything into a vibrant, lovely-smelling mixture. Add your chickpeas and stir, coating them in all the spicy goodness. Cook for another 2-3 minutes, then remove from the heat and allow to cool slightly.
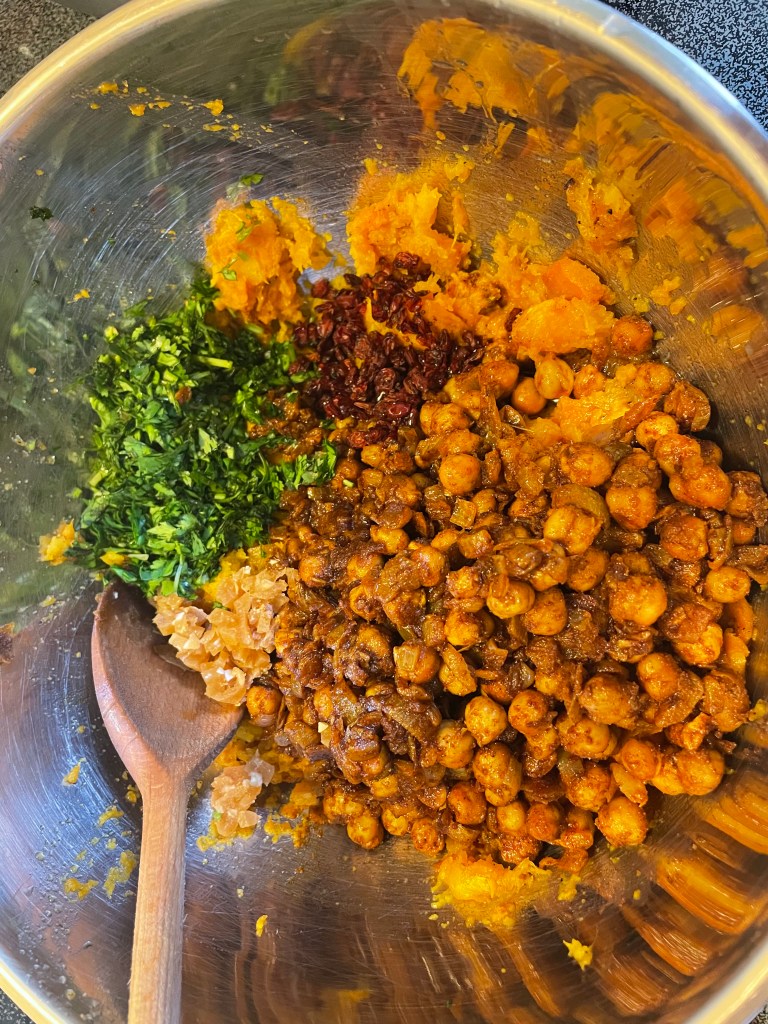
- Once your squash/sweet potato mixture has finished roasting, transfer the contents of the cooking sheet into a large bowl. Use a potato masher or wooden spoon to crush and mix the roasted vegetables. The goal is a rough mash with many intact roasted vegetable cubes suspended in a creamy matrix.
- To the squash mixture, add your chickpeas with all their accompanying juices and spices. Then mix in the chopped cilantro, preserved lemon, barberries, lemon juice, and the last 30ml/1tblsp olive oil. Gently mix all of this together – it should form a fairly compact filling with chunks of roasted vegetables and spiced chickpeas for texture, and pops of sharp barberries, funky preserved lemon, and pungent cilantro to keep the flavors exciting. Allow to cool fully before filling your pies (may be made the day before baking and stored in the fridge overnight).
For the pies:
- When ready to bake, make sure that your oven is still at 425F/220C or preheat the oven if this is the next day. Remove your pastry from the fridge and allow to sit on your kitchen counter/table for about 10 minutes. Just until pliable enough to work with but still cool to the touch.
- Either lightly flour your kitchen counter or (my preferred method because: lazy) put your pastry on a large sheet of parchment paper to roll out.
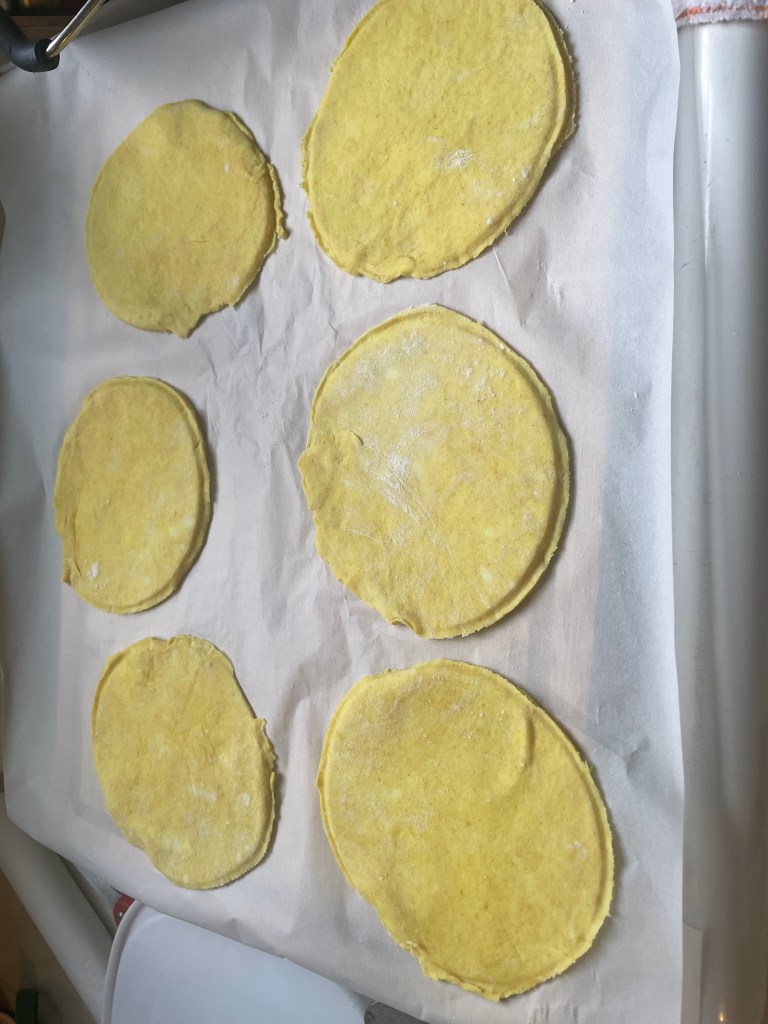
- Roll out the pastry until it is uniformly quite thin – about 0.5cm/1/4 inch thickness. I like to use a 12.75cm/5inch diameter round cutter to cut out my pastry circles. But it really depends on what size and shape you prefer for your pies: feel free to use a small round guide/cookie cutter or to hand cut square shapes and fill those.
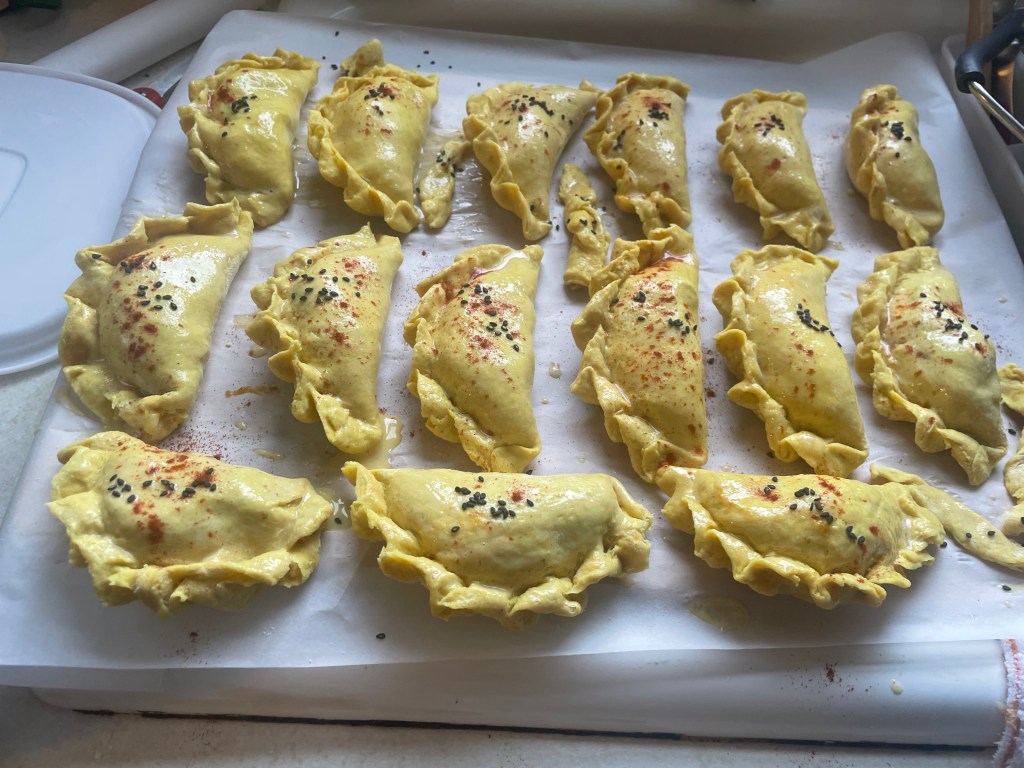
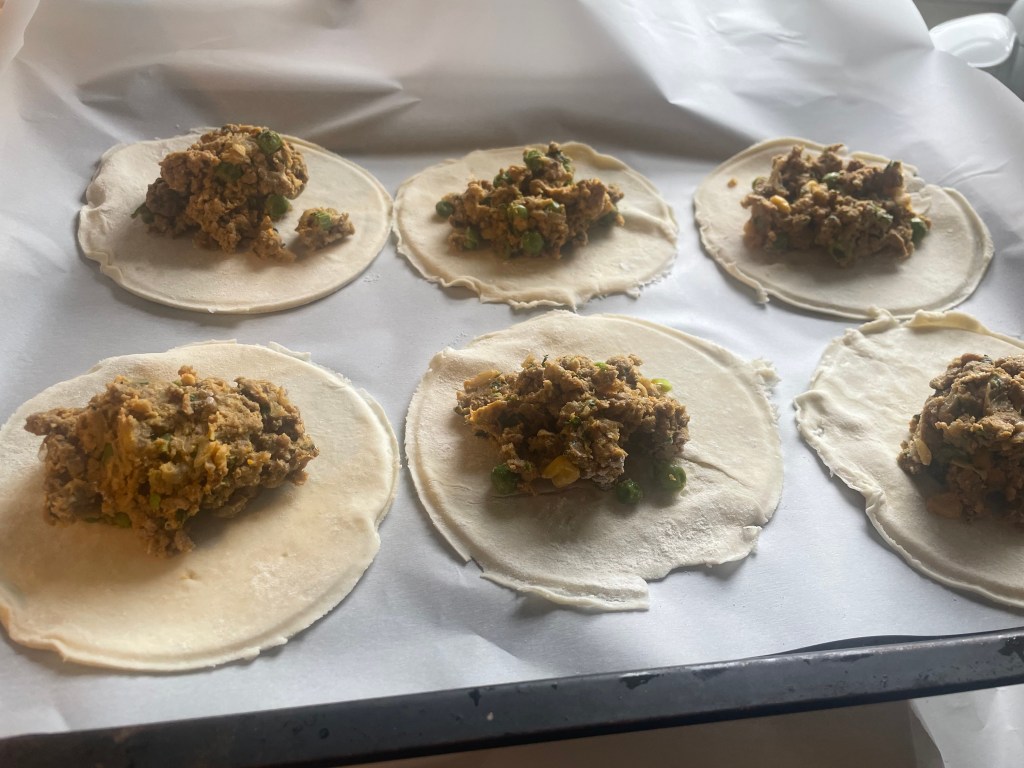
- Place about 60g/2tblsp of filling in the center of each circle, fold the pastry over the filling to form a half-moon shape, and then pinch the pastry edges firmly to close. You can use a little water to moisten the edges before you press them together if you are worried about a good seal forming. But this pastry tends to stick well to itself even without this trick. After sealing the pastry edge, I usually pinch it into multiple little crimps. It looks pretty and it also serves to close the pie more securely. I do re-roll my pastry fragments to cut out more circles. This is such a buttery dough that I have not noted any increase in toughness when I do this. And I do not like to waste my scraps.
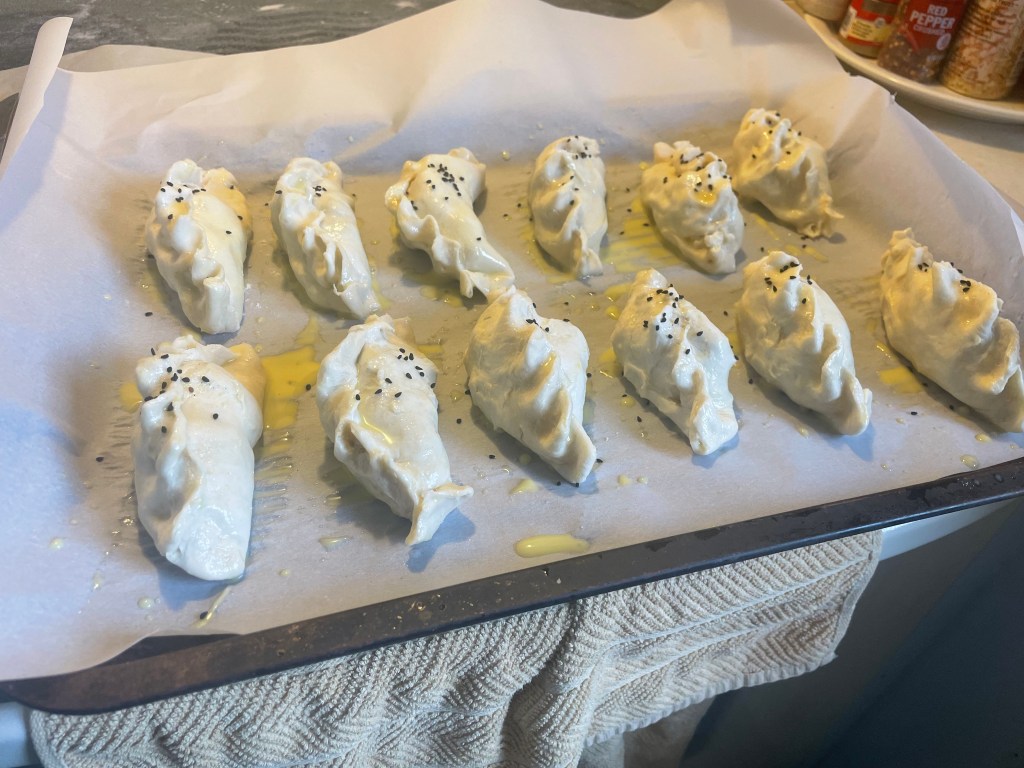
- Place the formed pies on two baking sheets lined with parchment paper. Brush with egg wash (1 egg beaten with a splash of cold water) and, if desired, sprinkle the tops with sea salt or paprika, or nigella seeds.
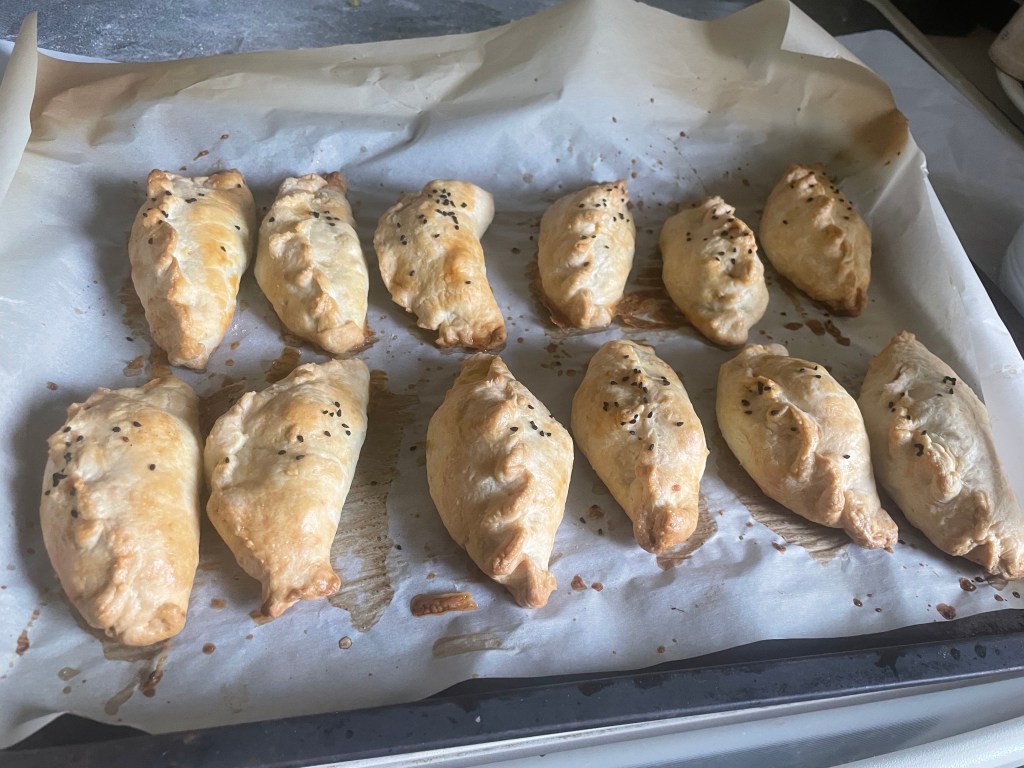
- Bake in the top and middle 1/3 of your oven for 30 minutes until the pastry is crisp and golden. Allow to cool for at least 15 minutes before enjoying. Be watchful – my oven is very elderly and decrepit. You may nod need the full 30 minutes of baking time. Start checking after 20-25 minutes.
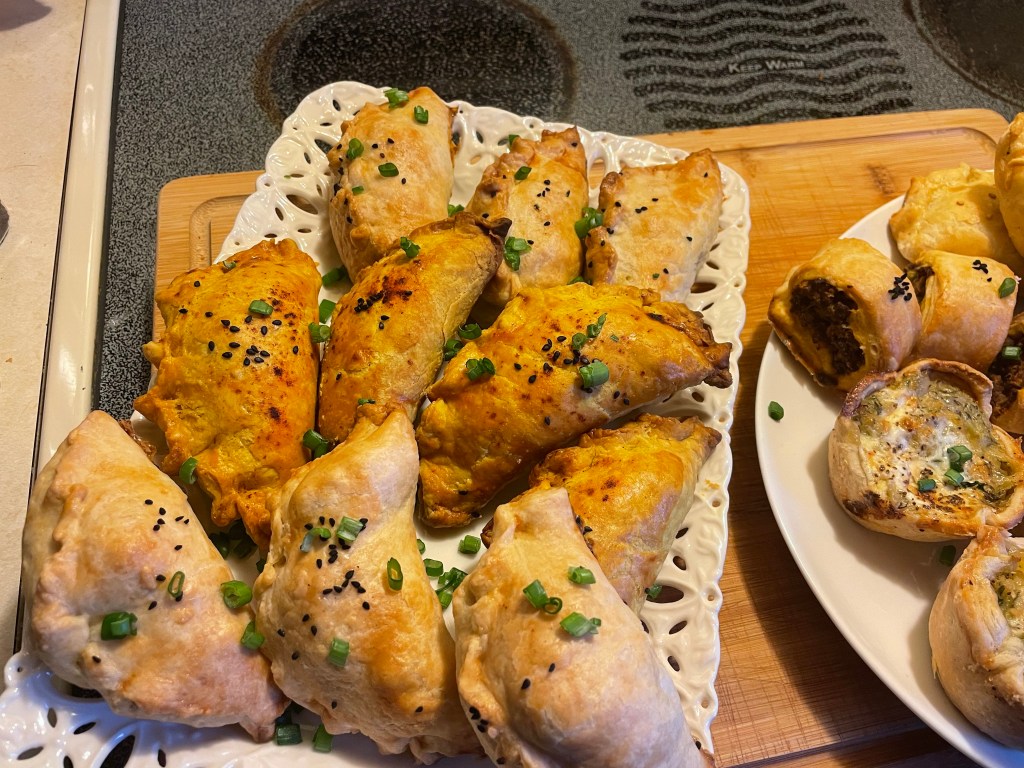
- These pies are most delicious fresh from the oven but are also very nice when served at room temperature or cold. They can be stored in the refrigerator for 3-4 days, or, tightly wrapped after baking, can be frozen for 3 months. Reheat in a 350F/175C oven directly from frozen.
Variations:
If you do not mind the addition of dairy and you want a richer, creamier filling, feel free to add cheese into the filling (truly, is anyone surprised that I would recommend cheese?). A mixture of grated low-moisture mozzarella and small cubes of feta is very nice. Add about 100g/1/2 cup of each to enrich your vegetable filling if desired.
Alternatively, keep the filling to just vegetables but serve the pies with a yogurt sauce (225g/1cup full fat yogurt mixed with 1 minced garlic clove, 5g/1tsp cumin, 30g/1tblsp chopped preserved lemon, small handful mixed chopped soft herbs like parsley, chives, dill, and cilantro, and salt and pepper to taste).


Creamy cabbage, potato, and dill hand pies.
Makes 24 small tarts.
Ingredients:
1 batch of basic flaky pastry
750ml/3 cups chicken stock (or 1 chicken bouillon cube dissolved in 750ml hot water)
900g/2lb non-waxy potatoes (medium starch potatoes such as Yukon Gold are recommended), peeled and cut into 2-3cm/1-2inch cubes
1 bay leaf, fresh or dry
1 sprig fresh thyme
Salt and pepper to taste
30g/2tblsp unsalted butter
1 small onion, peeled and finely chopped
2-3 medium garlic cloves, minced
1/2 small cabbage (young green cabbage, Savoy cabbage, or Napa cabbage all work well here), cleaned and chopped.
1 large bunch fresh dill, cleaned and finely chopped
125ml/1/2 cup heavy cream
Salt and pepper to taste
125ml/1/2 cup sour cream, crema, or crème fraiche
100g/1/2 cup freshly grated Parmesan cheese
30g/1tblsp dried celery seeds
Method:
For the Filling:
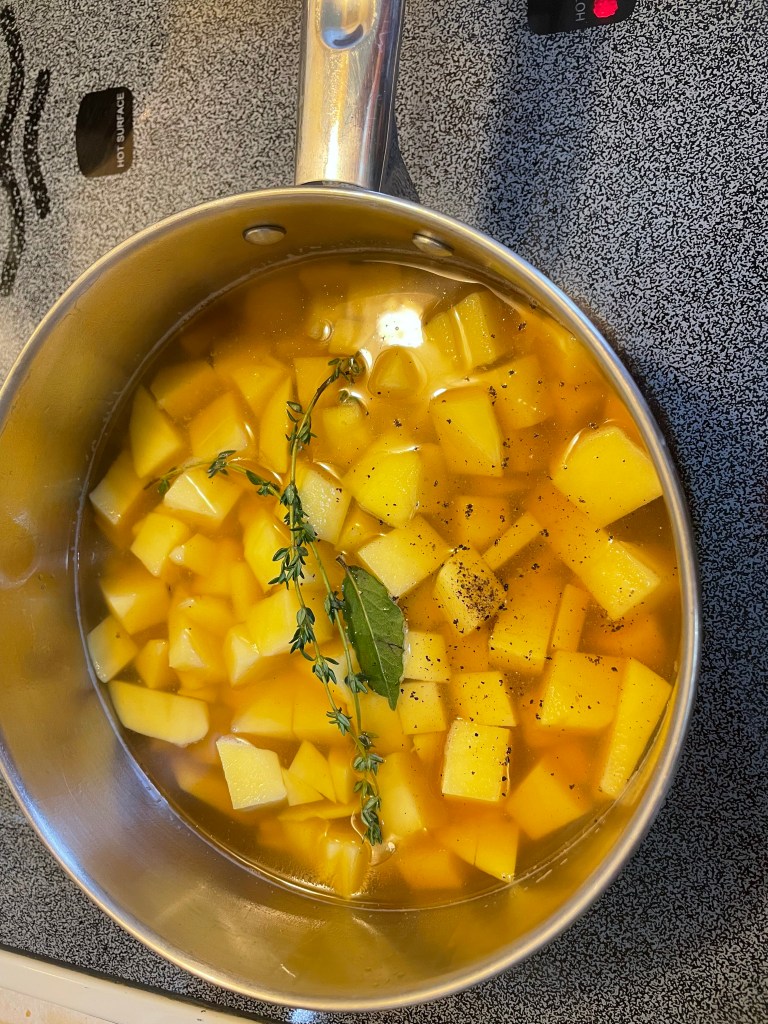
- Place the cubed potatoes, chicken stock to cover, bay leaf, thyme sprig, and salt and pepper in a pot. Cover and bring to a boil. Remove the cover and allow to cook until the potato cubes are easily pierced with a fork – about 20 minutes.
- Drain the potatoes, reserving their cooking liquid. Set potatoes aside to cool and return the liquid to the pot, allowing it to continue simmering and reducing while you work on the cabbage.
- In a large pan, melt the 30g butter. When it is sizzling, add your chopped onion and fry on medium heat until it is soft and sweet and glassy but has not taken on any color.
- Add the minced garlic and cook for another 1-2 minutes.
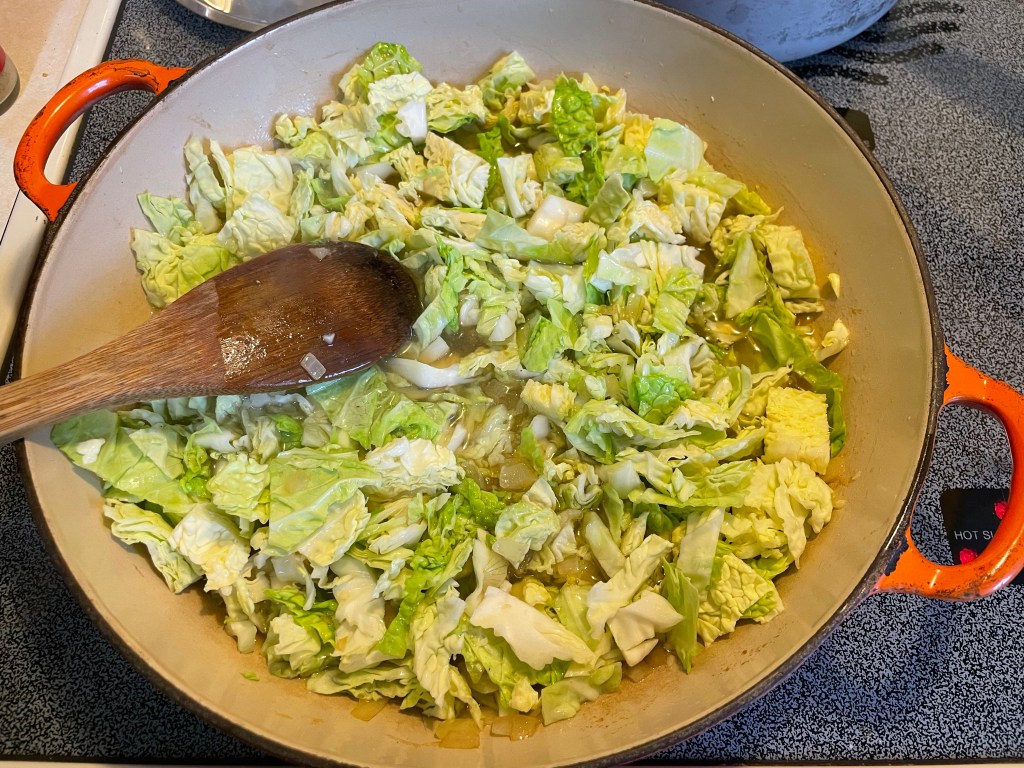
- Add in the cabbage and then ladle in enough of the potato cooking liquid to moisten the contents of the frying pan. The cabbage should not be swimming or submerged in liquid but should be bubbling cheerfully instead of dry frying.
- Continue to cook until the liquid has reduced to a thick syrupy consistency and your cabbage is just tender, approximately 10-12 minutes.
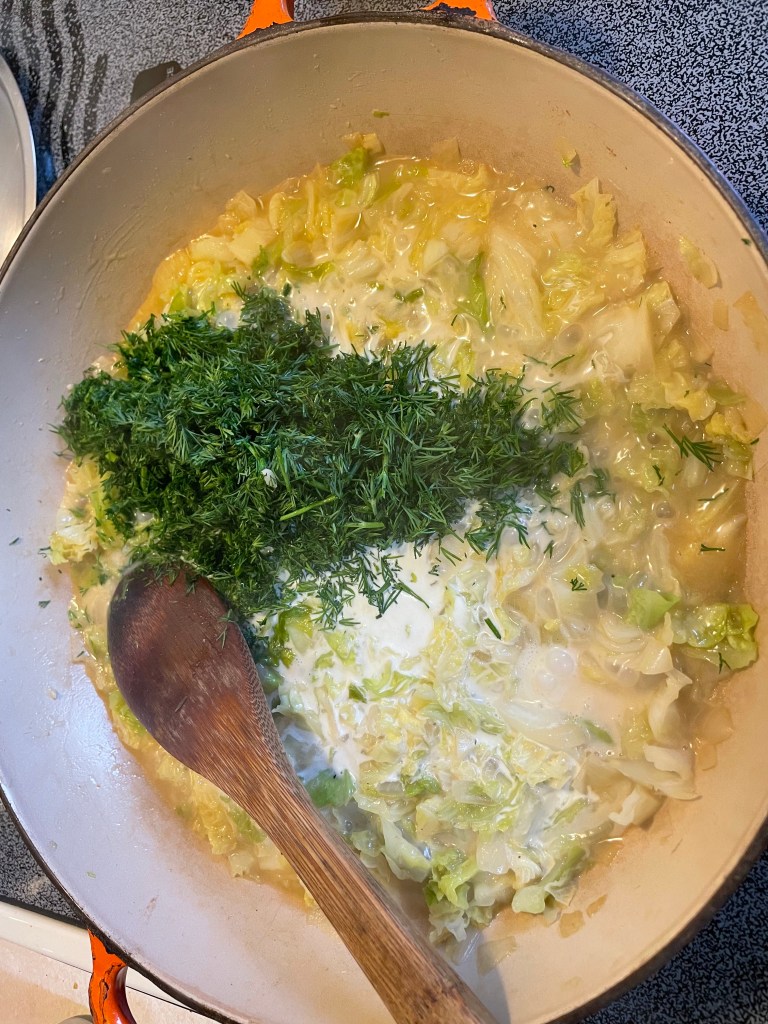
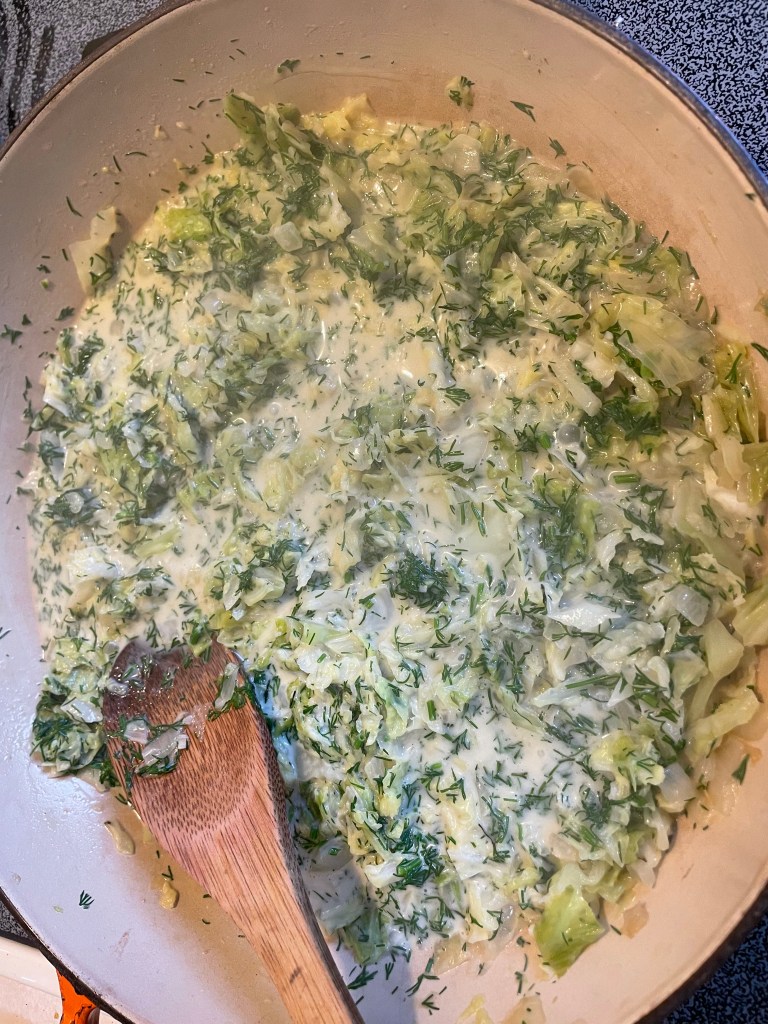
- Add chopped dill and heavy cream to the pan, and then season to taste with salt and pepper.
- Allow to simmer for another 1-2 minutes, then remove from the heat.
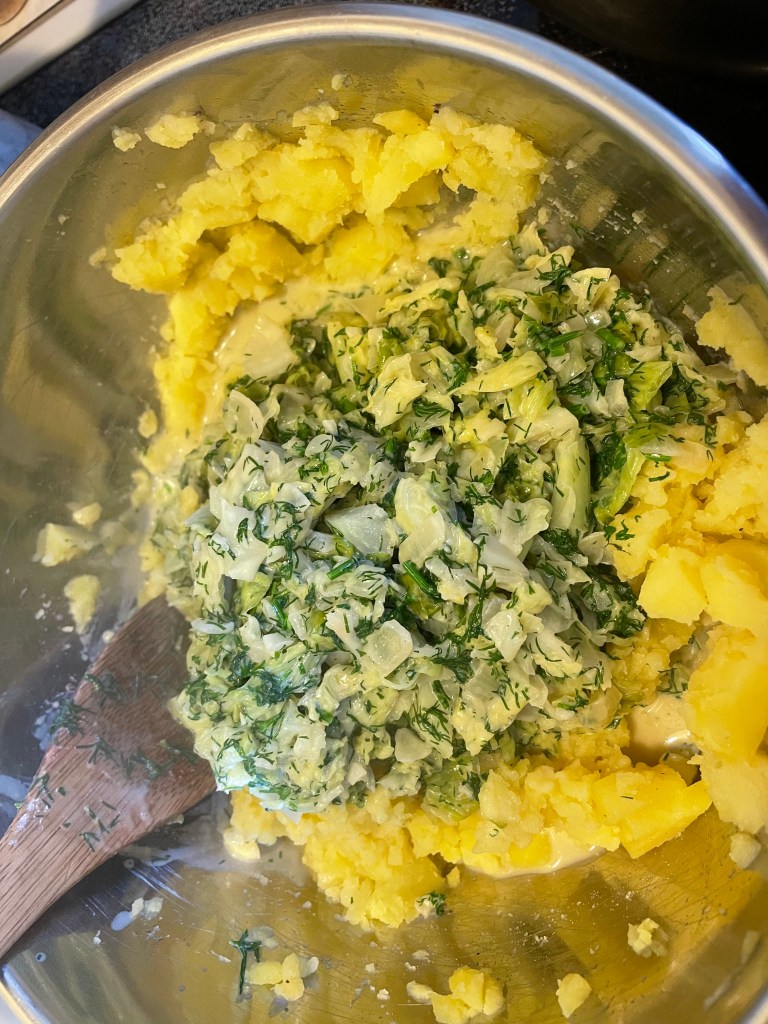
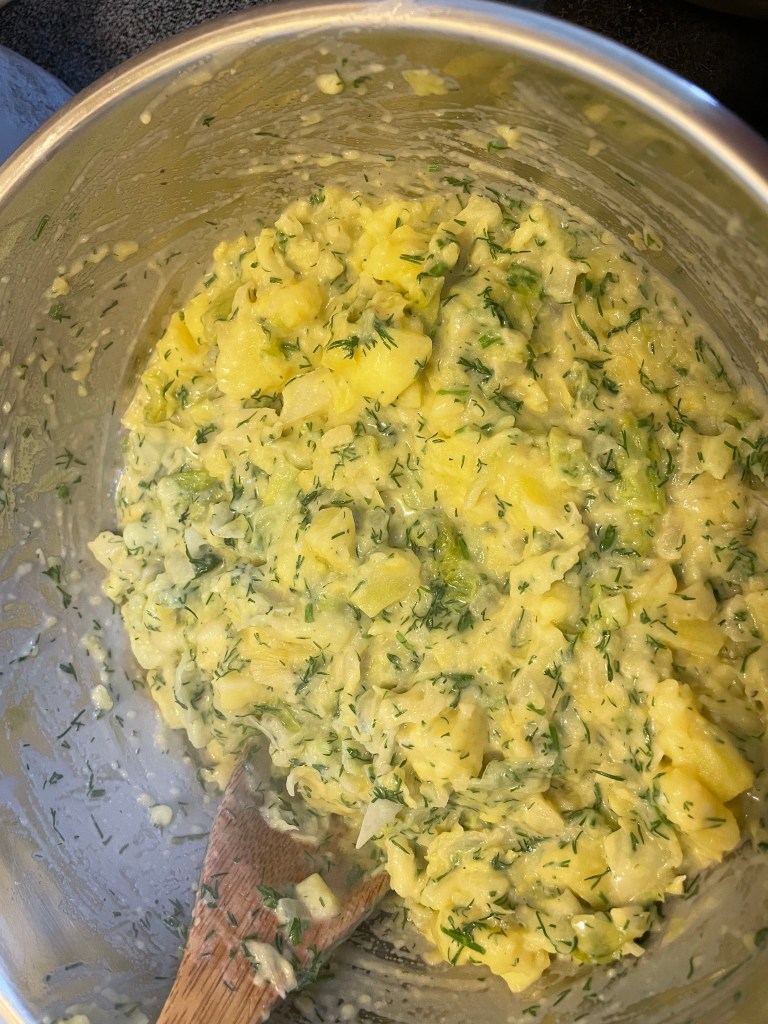
- In a large bowl, combine the cooked potatoes cubes with the creamy cabbage. Stir energetically to make sure that some of the potatoes get roughly mashed – this will help keep the filling together.
- The filling can be used as soon as it has cooled, or can be stored, covered, in the refrigerator overnight.
For the Pies:
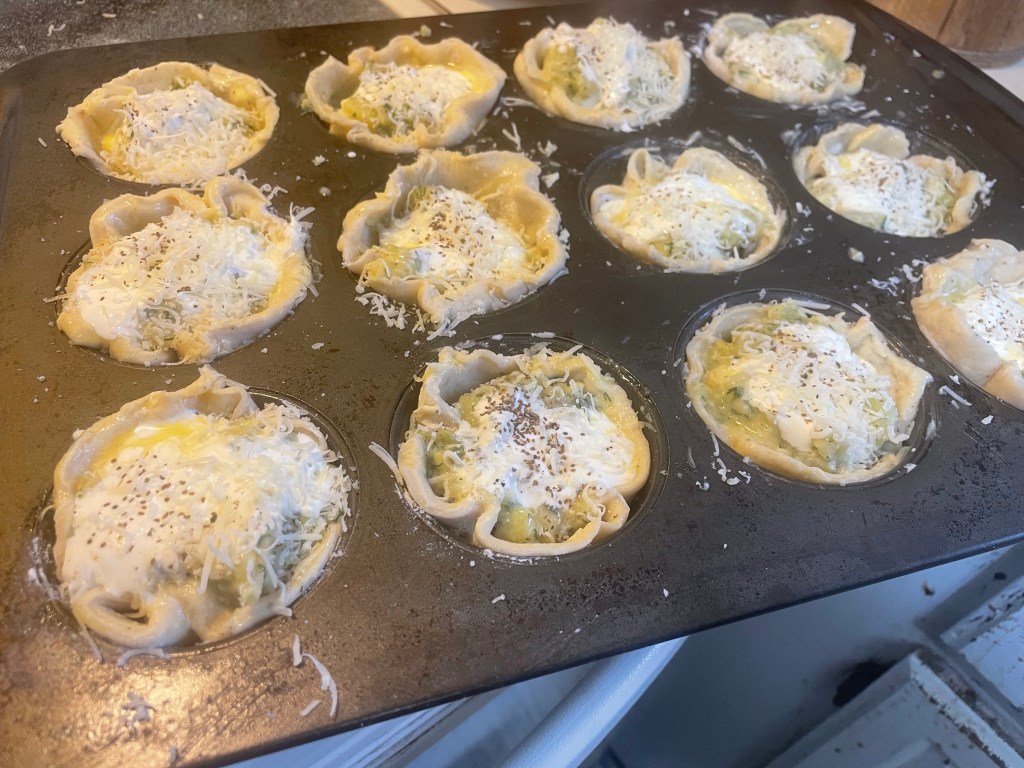
- When ready to bake, preheat your oven to 425F/220C. Remove your pastry from the fridge and allow to sit on your kitchen counter/table for about 10 minutes. Just until pliable enough to work with but still cool to the touch. Use softened butter to grease the cups of two 12-cup muffin baking pans or apply non-stick spray.
- Either lightly flour your kitchen counter or (my preferred method because: lazy) put your pastry on a large sheet of parchment paper to roll out.
- Roll out the pastry until it is uniformly quite thin – about 0.5cm/1/4 inch thickness. I use a 7.5cm/3inch diameter round cutter to cut out my pastry circles. Place the pastry circles into the cups of your muffin baking pan.
- Fill each pastry-lined muffin cup about 3/4 full of cabbage and potato filling.
- Add 5ml/1tsp of sour cream, crema, or crème fraiche to the top of each muffin cup. Then sprinkle each cup with a pinch of grated Parmesan cheese, freshly ground pepper, and celery seeds.
- Bake in the top and middle 1/3 of your oven for 30 minutes until the pastry is crisp and the top of the filling is puffed, golden, and bubbling. Allow to cool for at least 15 minutes before enjoying.
- These pies are most delicious fresh from the oven but are also very nice when served at room temperature or cold. They can be stored in the refrigerator for 3-4 days, or, tightly wrapped after baking, can be frozen for 3 months. Reheat in a 350F/175C oven directly from frozen.
Variations:
If you want a more robust pie, add 230g/1 cup chopped smoked kielbasa to the pan when frying the onions, along with 2.5g/1/2 tsp each of caraway and cumin seeds. The filling will be less the delicate and vegetal of spring-time feasting and more the hearty and meaty fare of colder climes, but it does make a nice change.


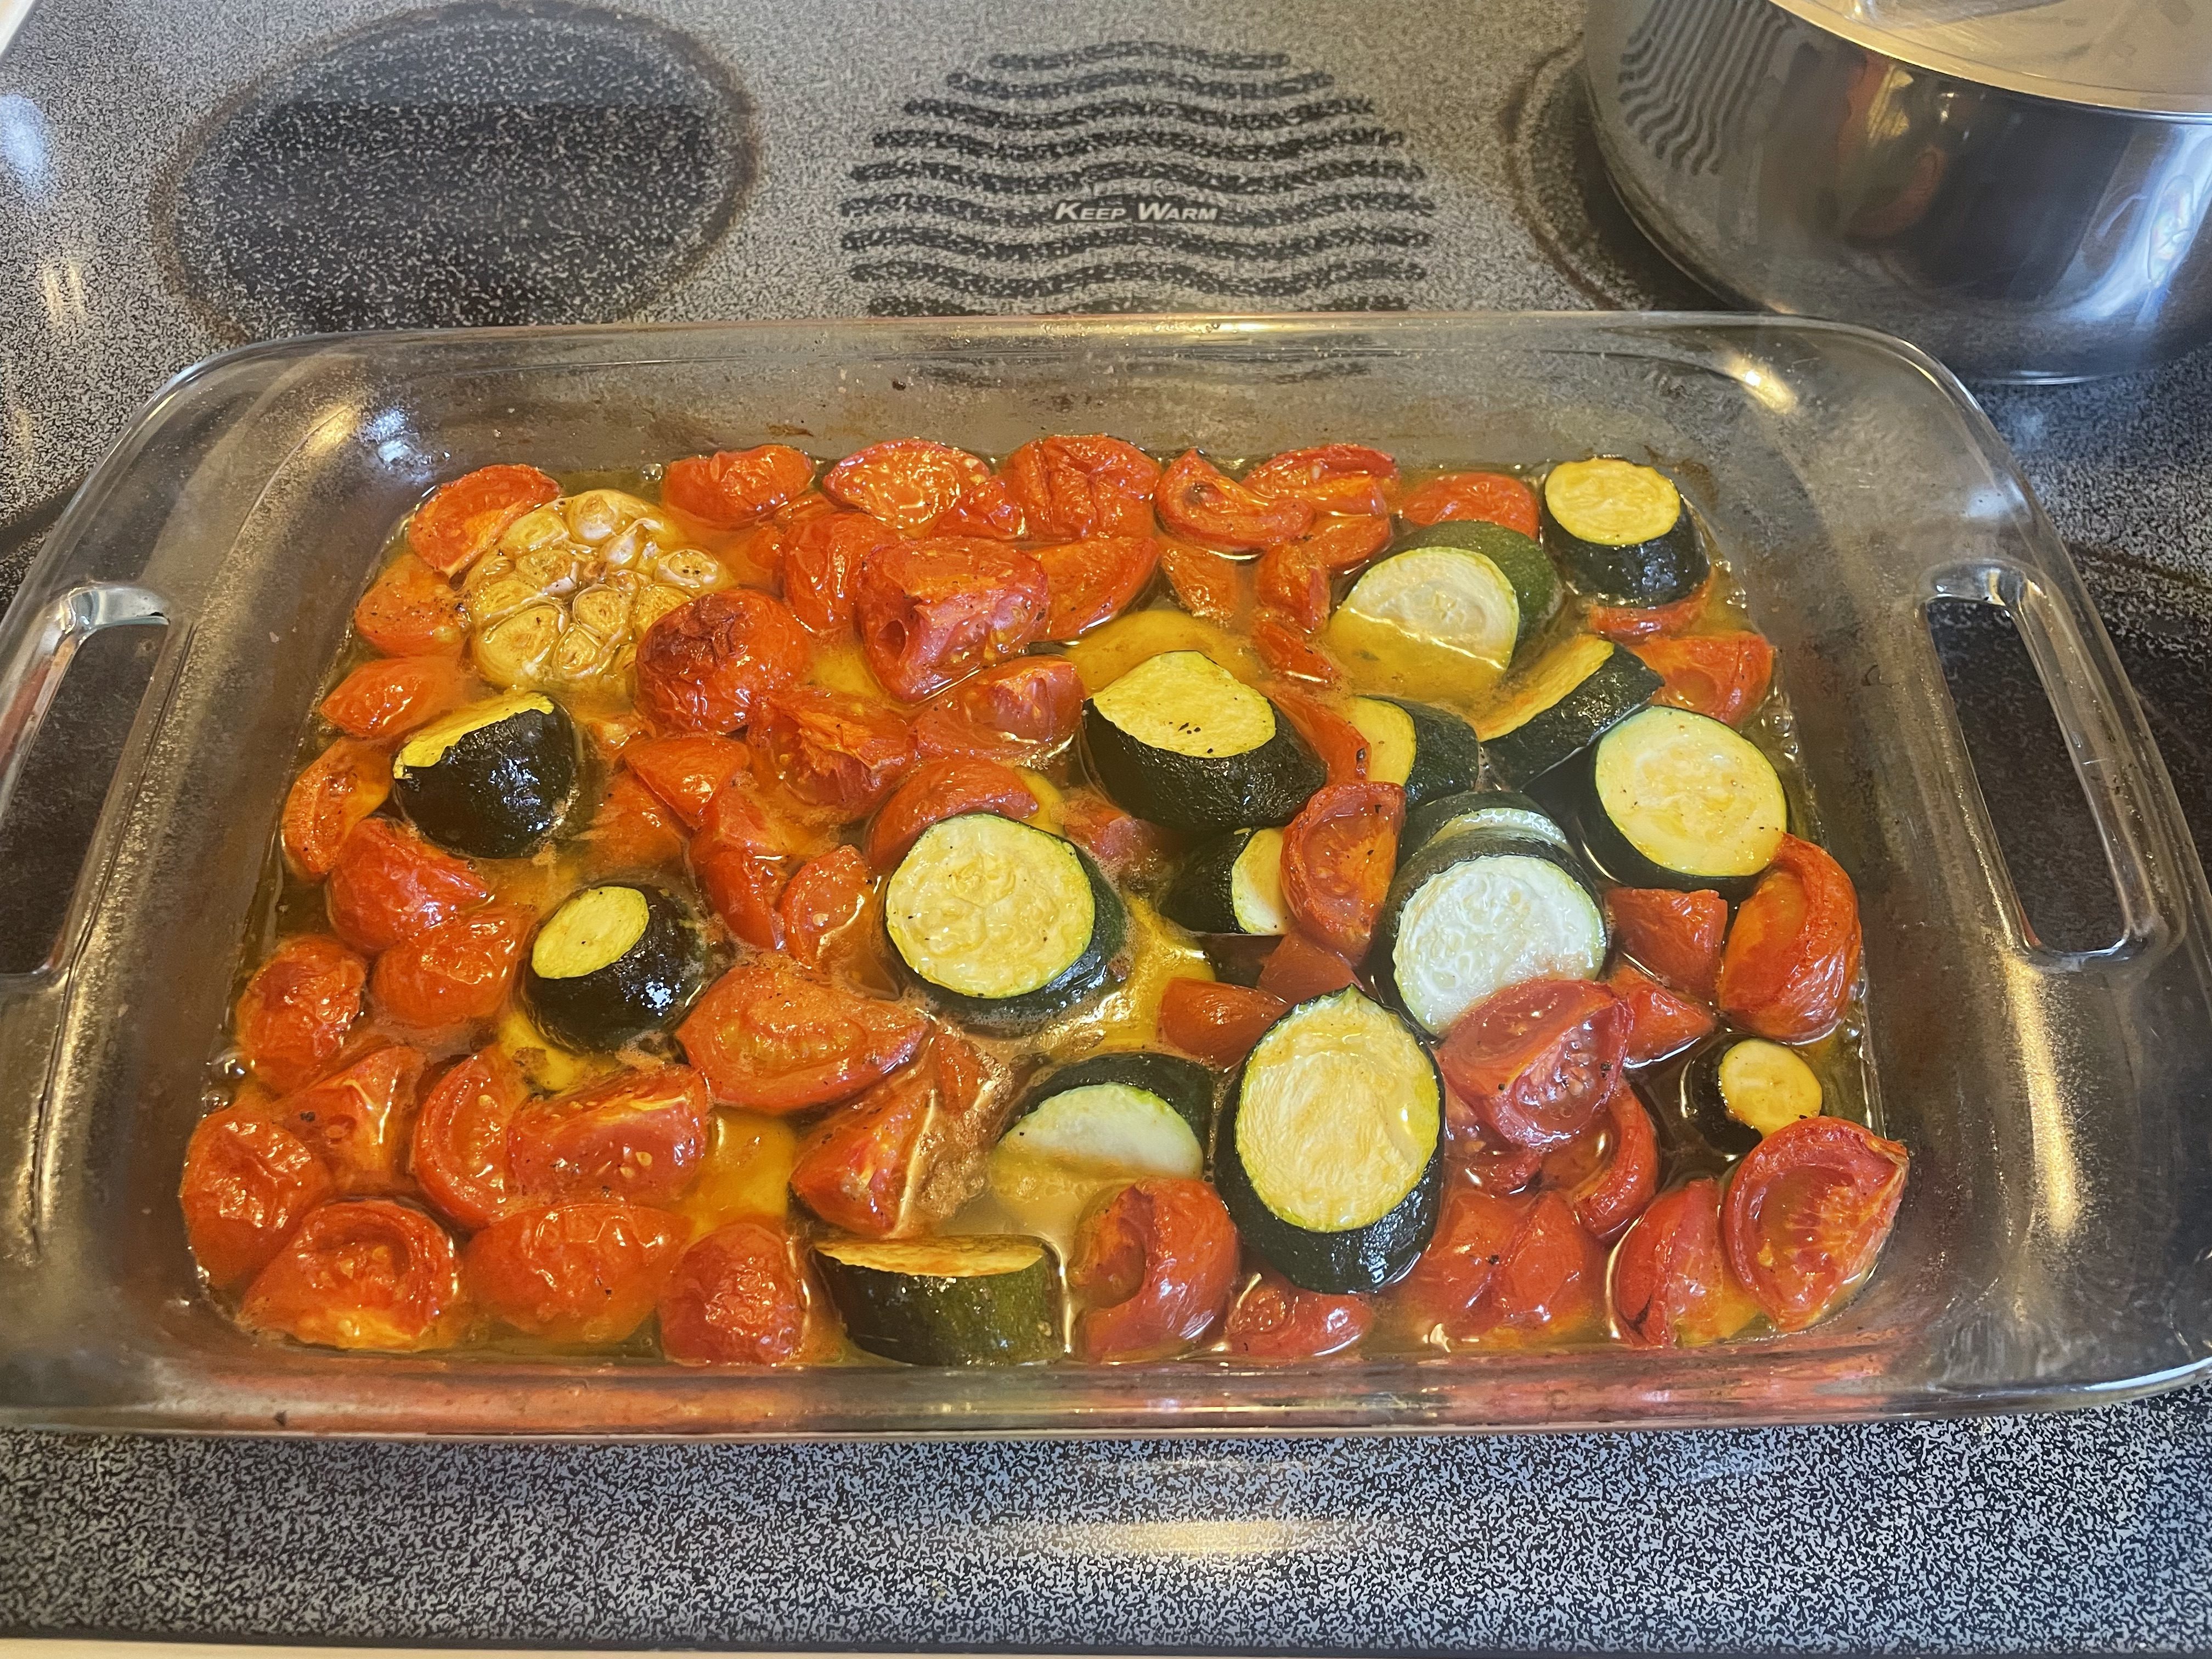
Roasted tomato, zucchini, and quinoa pasties.
Makes 16 pies.
Ingredients:
1 batch of basic flaky pastry/vegan pastry
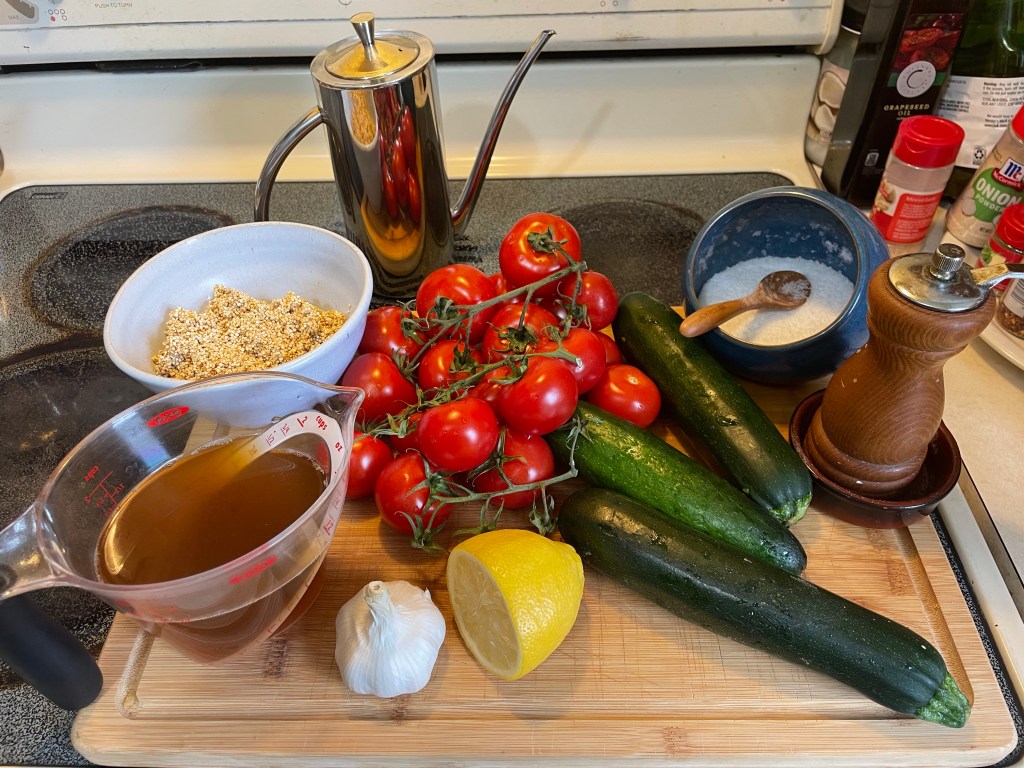
450g/1lb fresh tomatoes, washed and quartered
220g/1/2lb green zucchini, washed, trimmed, and cut into 2cm/1inch slices
1 head garlic, rinsed, unpeeled and intact but the top 1/8 trimmed off to reveal the little fang-like cloves lurking inside the papery skin
125ml/1/2 cup olive oil
Salt and freshly ground black pepper to taste
90g/1/2 cup uncooked quinoa, well-rinsed/massaged under running cold water
180ml/3/4 cup broth (chicken broth, vegetable stock, dashi, or your preferred flavored cooking liquid)
1 bunch of fresh basil or 5g/1tsp dry basil
30ml/1tblsp lemon juice
Method:
For the Filling:
- Center a rack in the middle of the oven and preheat the oven to 350F/170C.
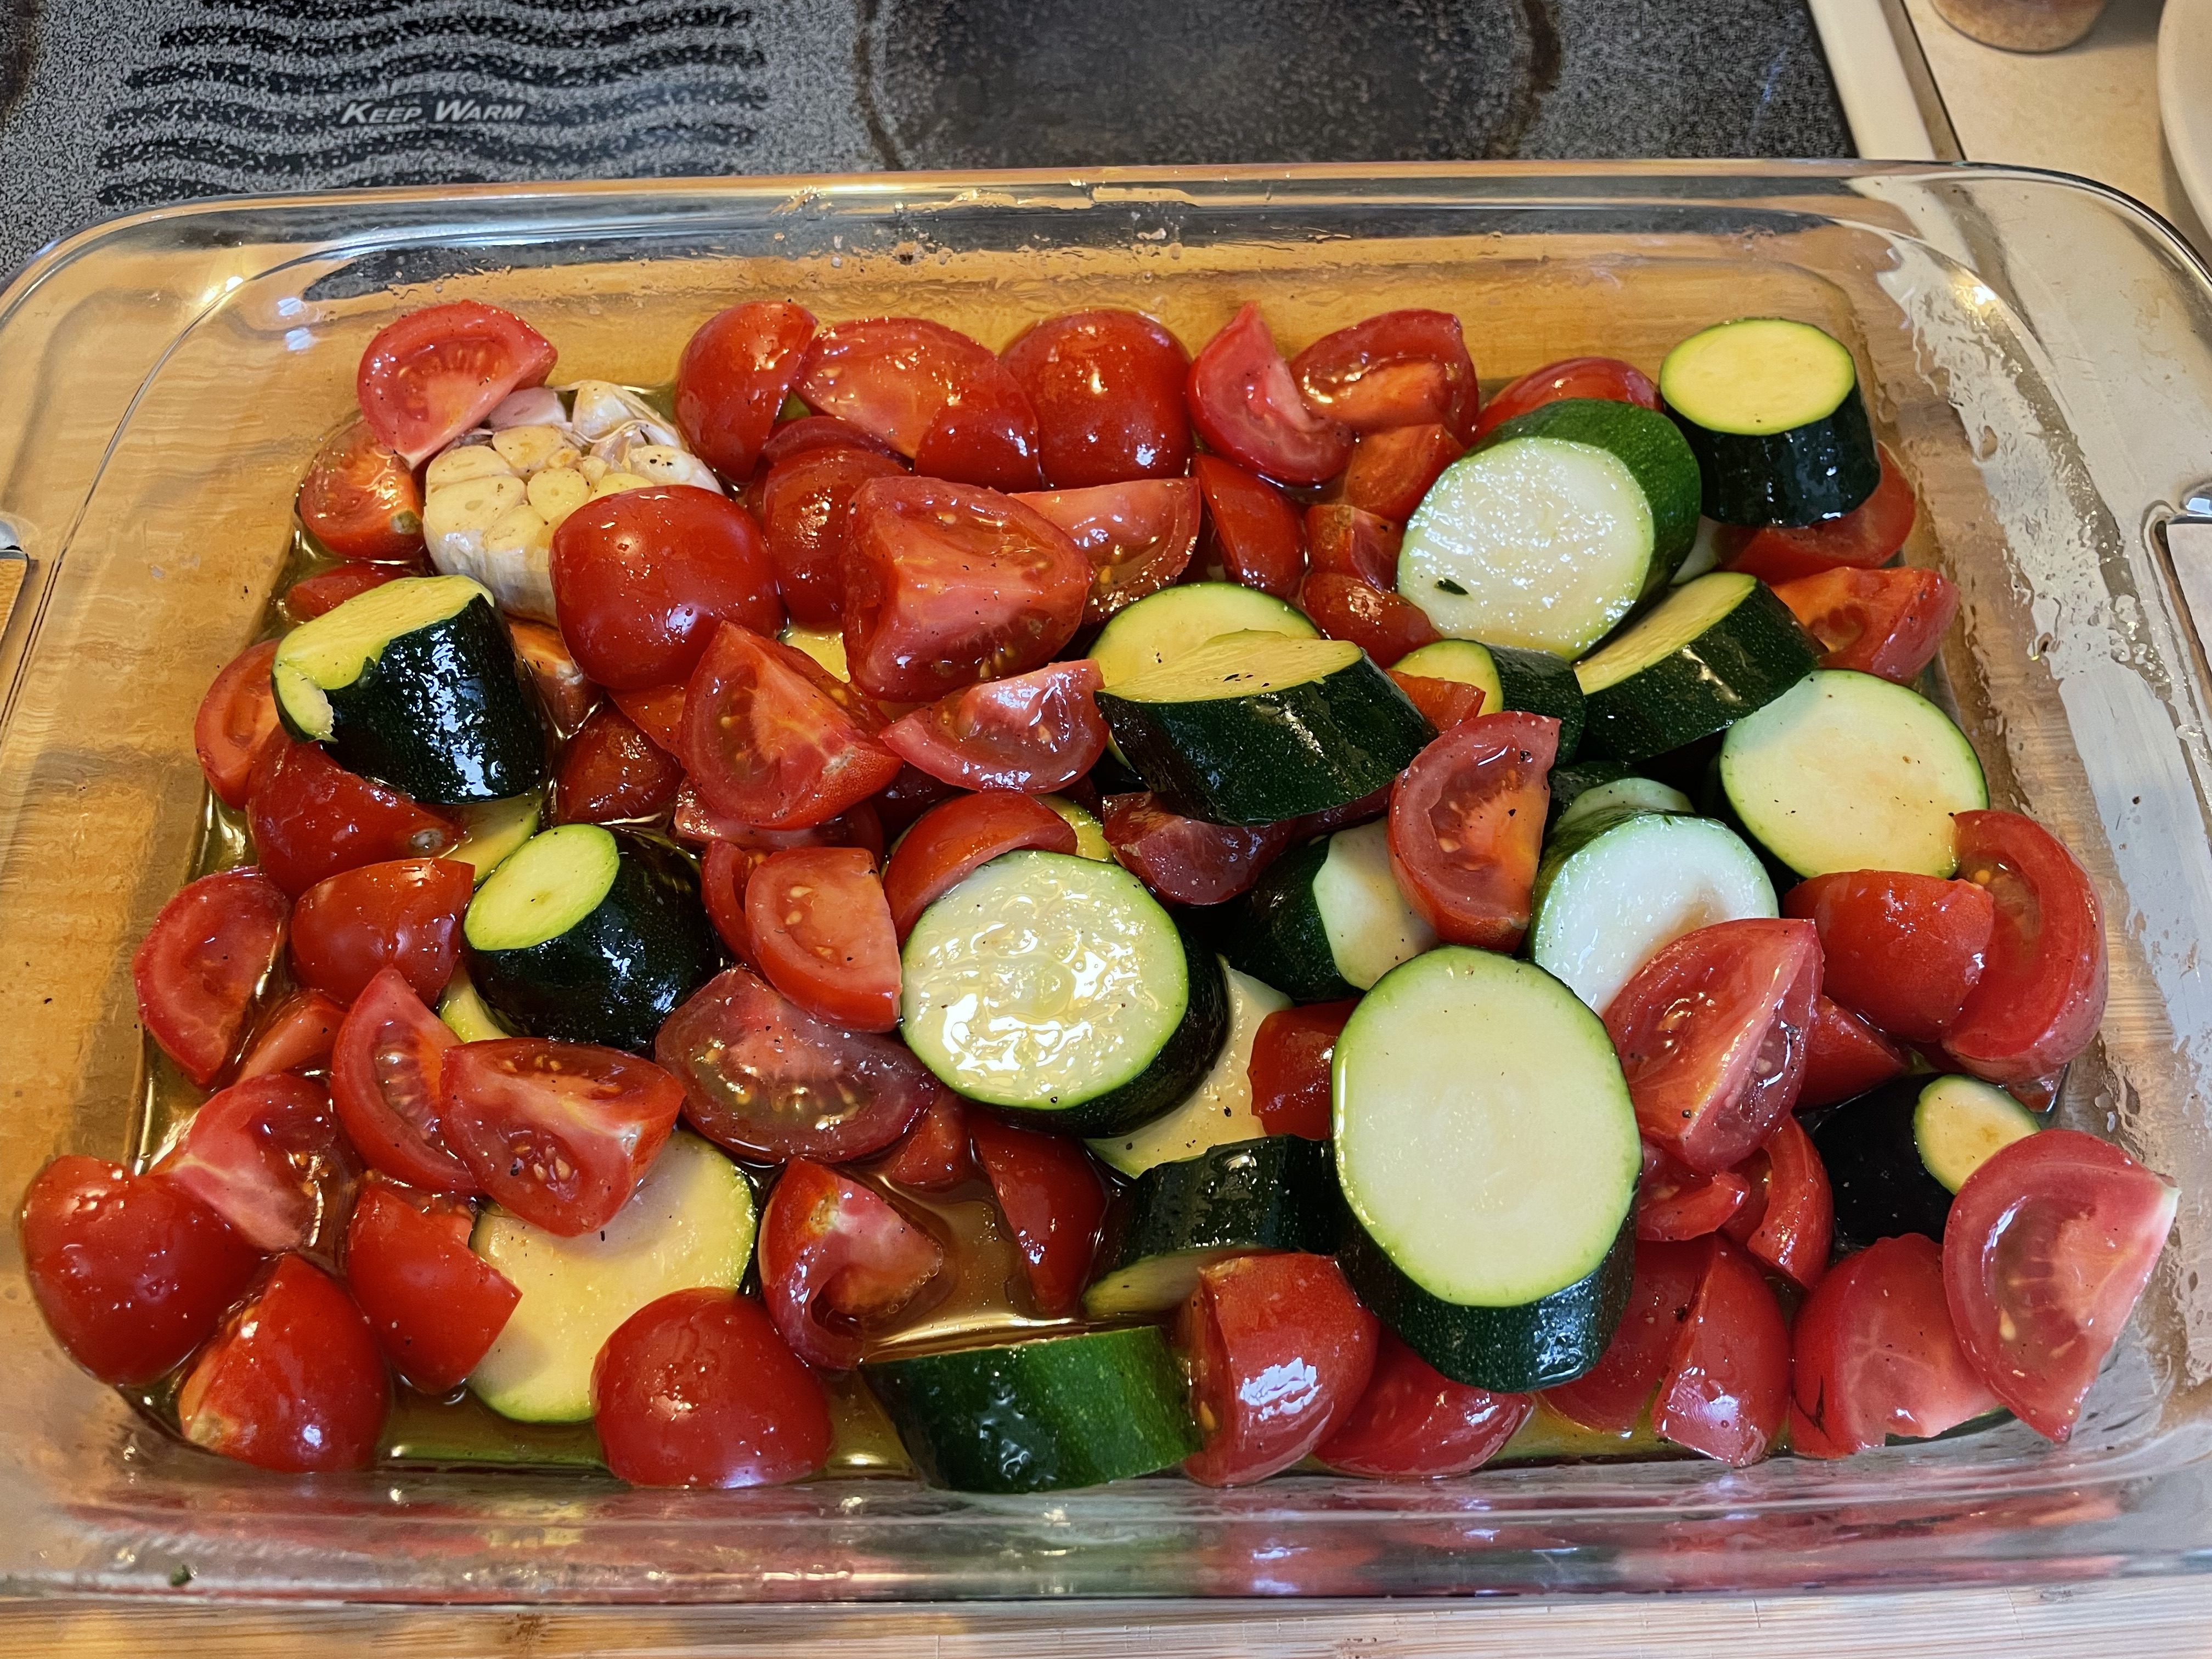
- Place the tomatoes, zucchini, garlic head, olive oil, salt, and freshly ground black pepper into a medium baking or casserole dish (20x20cm or 9×9 inch glass baking dish works well) and stir together until all of the vegetables are well-coated with oil.
- Bake, uncovered, for 1 hour until the vegetables are very soft and collapsing in on themselves and the oil is infused with the lovely scents and colors of the tomatoes and garlic.
- Meanwhile, in a medium pot, combine broth with your well-washed quinoa. Cover and bring to a boil. Lower the heat and allow to simmer, covered, for 15 minutes. Remove from heat but leave unopened to finish steaming for another 5 minutes. Then fluff the cooked quinoa with a fork and leave to cool.
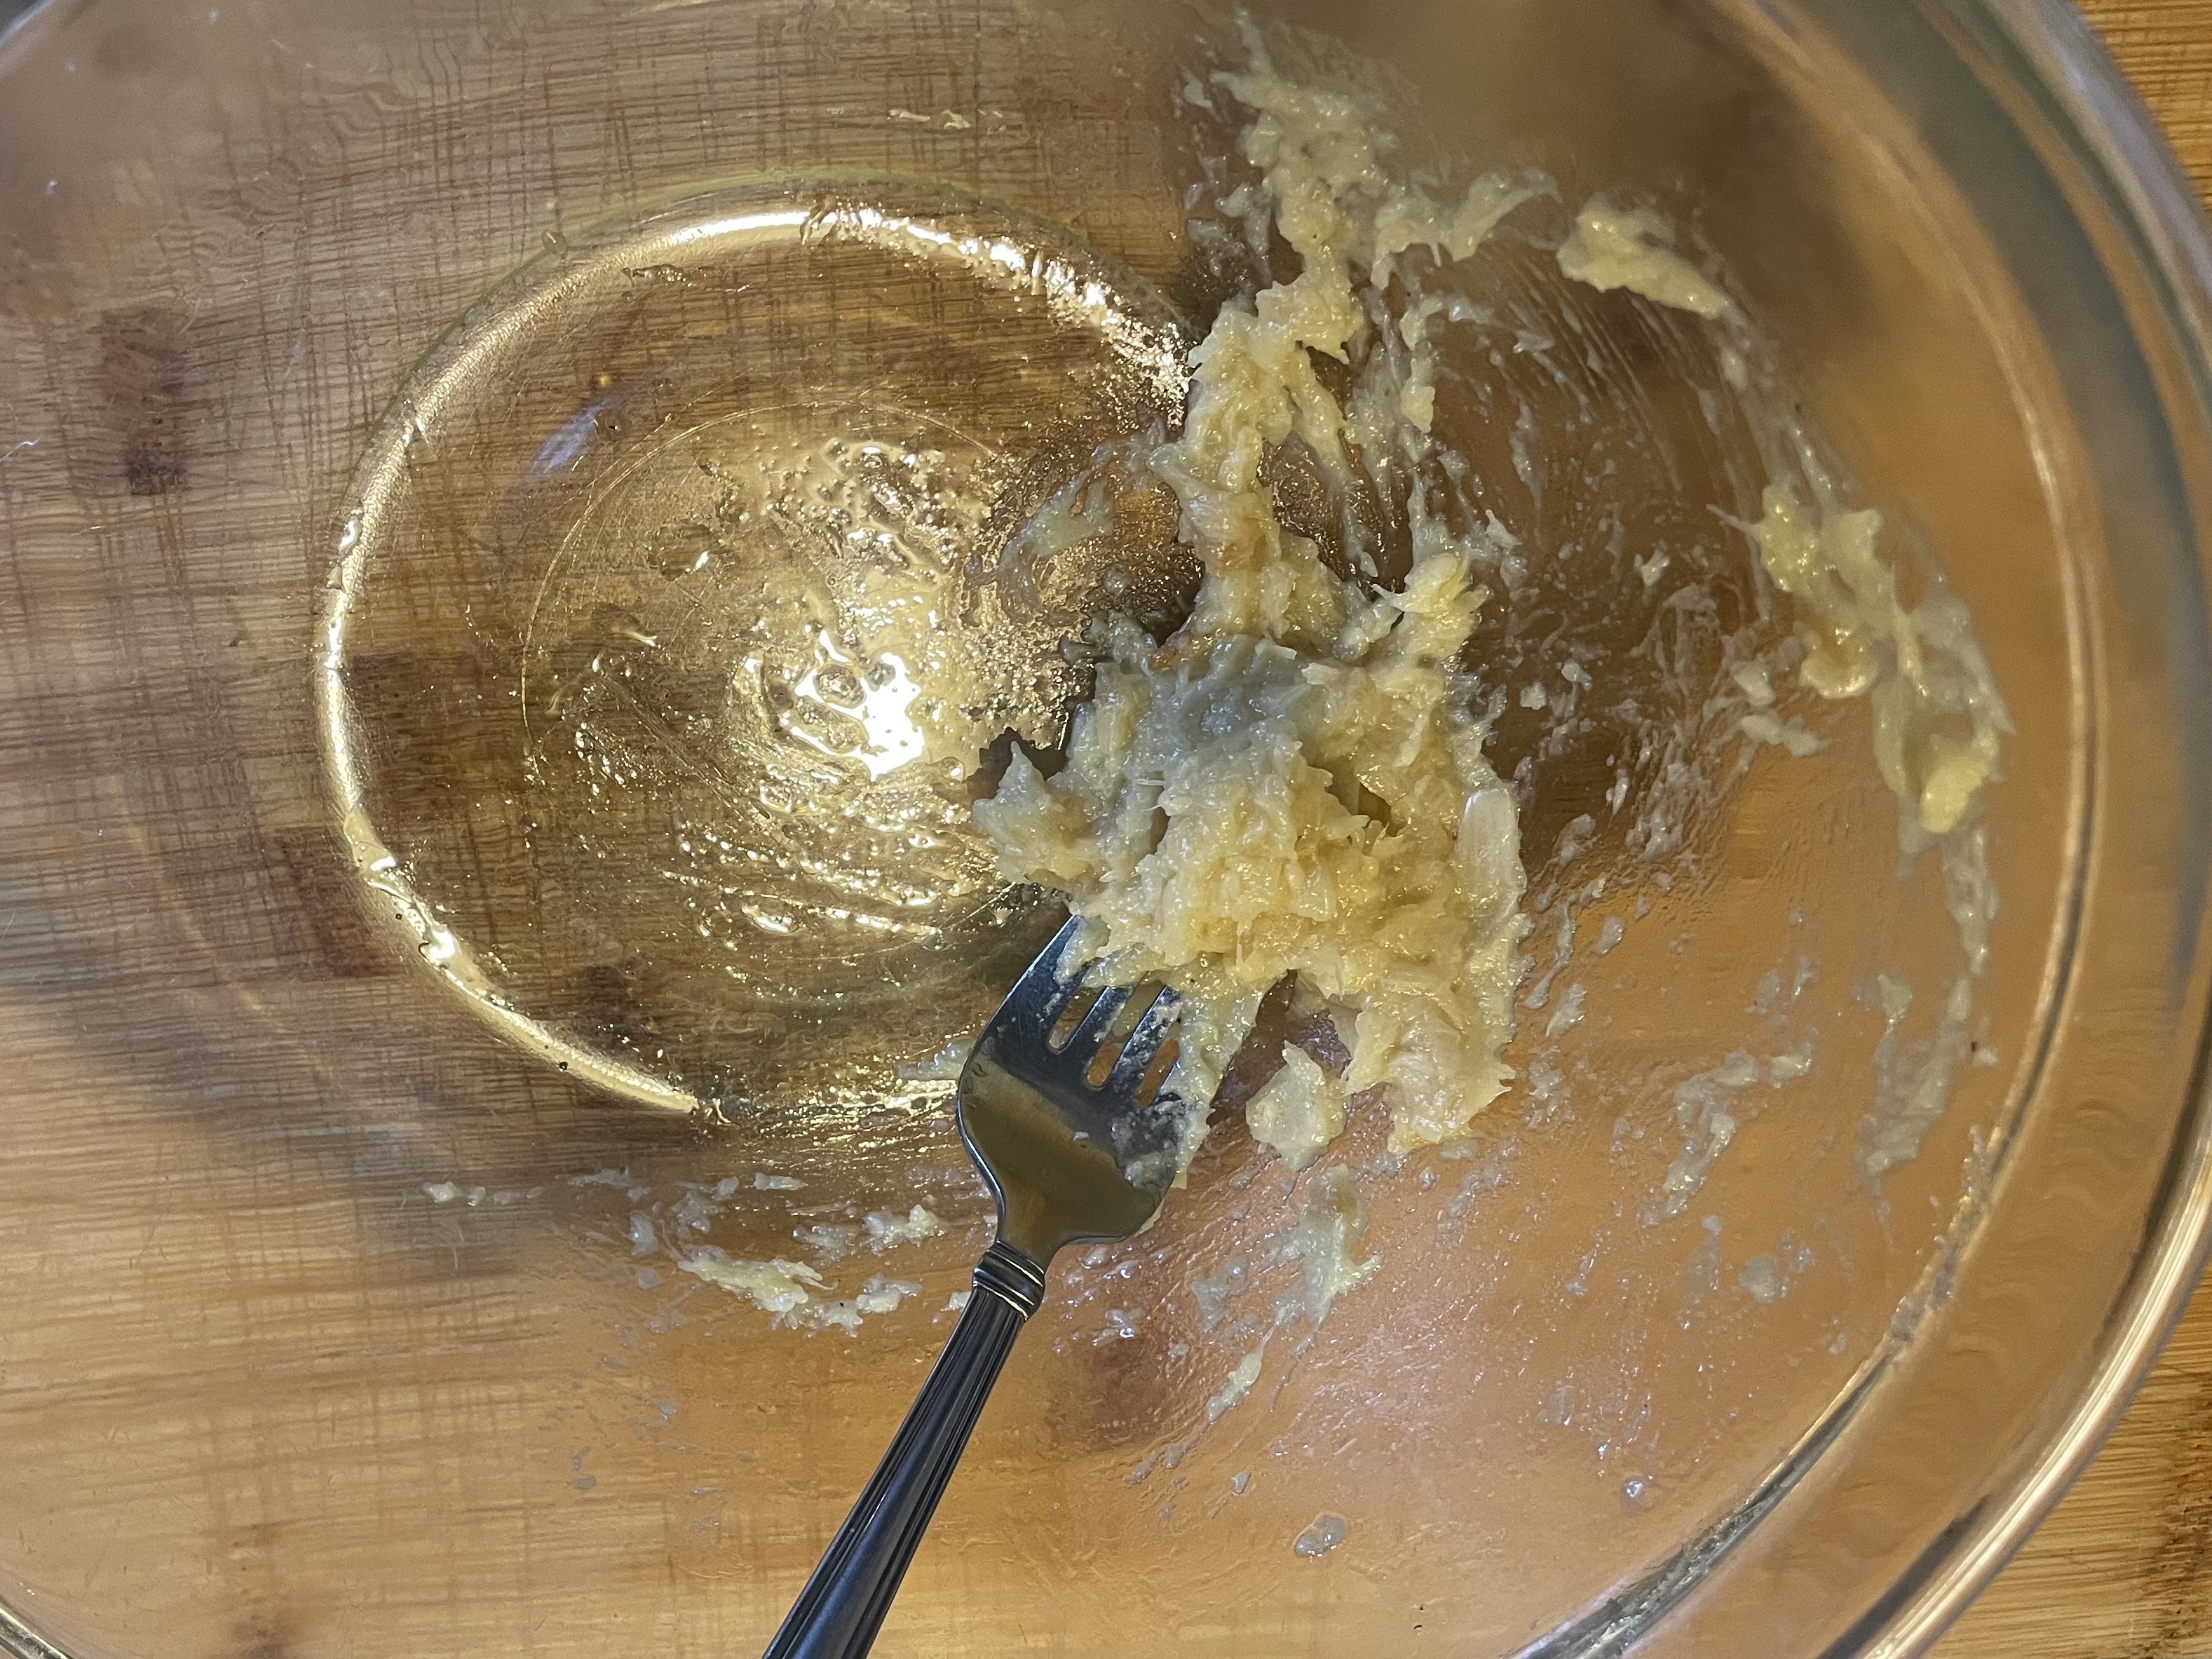
- When your vegetables have roasted, carefully remove the garlic from the baking dish and leave until cool enough to handle. When it is no longer burningly hot, squeeze each caramelized garlic clove out into a large bowl and discard the peel. Use a fork to mash the roast garlic until creamy rather than chunky.
- Transfer the remaining vegetables and the fragrant oil into the bowl with the garlic, and then add the quinoa.
- Tear or chop the basil into a chiffonade right before you are ready to use it, then add to the large bowl with the roasted vegetables and quinoa. Finally add the lemon juice and check for seasoning. This may need a little more salt or pepper, or another glug of olive oil to bring it all together. Like the other fillings, you may use this as soon as it is cool or store it in the refrigerator for up to 3 days before baking your pasties.
For the pies:
- When ready to bake, pre-heat your oven to 425F/220C. Remove your pastry from the fridge and allow to sit on your kitchen counter/table for about 10 minutes. Just until pliable enough to work with but still cool to the touch.
- Either lightly flour your kitchen counter or (my preferred method because: lazy) put your pastry on a large sheet of parchment paper to roll out.
- Roll out the pastry until it is uniformly quite thin – about 0.5cm/1/4 inch thickness. I like to use a 12.75cm/5inch diameter round cutter to cut out my pastry circles. But it really depends on what size and shape you prefer for your pies: feel free to use a small round guide/cookie cutter or to hand cut square shapes and fill those.
- Place about 60g/2tblsp of filling in the center of each circle, fold the pastry over the filling to form a half-moon shape, and then pinch the pastry edges firmly to close. You can use a little water to moisten the edges before you press them together if you are worried about a good seal forming. But this pastry tends to stick well to itself even without this trick. After sealing the pastry edge, I usually pinch it into multiple little crimps. It looks pretty and it also serves to close the pie more securely. I do re-roll my pastry fragments to cut out more circles. This is such a buttery dough that I have not noted any increase in toughness when I do this. And I do not like to waste my scraps.
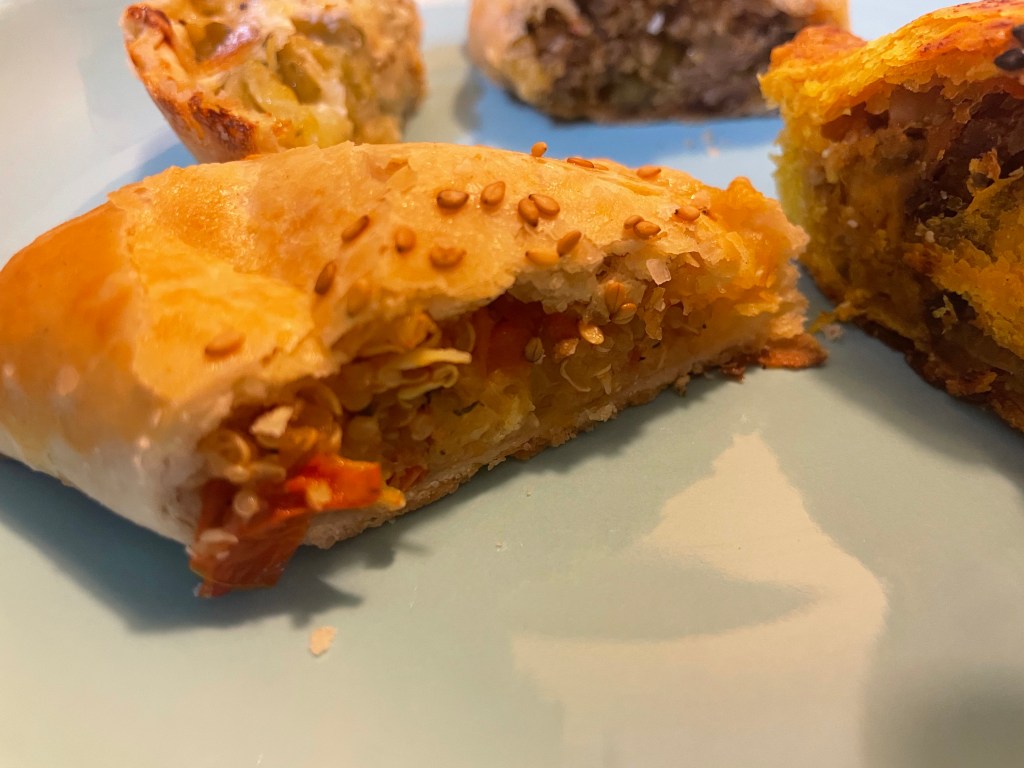
- Place the formed pies on two baking sheets lined with parchment paper. Brush with egg wash (1 egg beaten with a splash of cold water) and, if desired, sprinkle the tops with sea salt or sesame seeds.
- Bake in the top and middle 1/3 of your oven for 30 minutes until the pastry is crisp and golden. Allow to cool for at least 15 minutes before enjoying. Be watchful – my oven is very elderly and decrepit. You may nod need the full 30 minutes of baking time. Start checking after 20-25 minutes.
- These pies are most delicious fresh from the oven but are also very nice when served at room temperature or cold. They can be stored in the refrigerator for 3-4 days, or, tightly wrapped after baking, can be frozen for 3 months. Reheat in a 350F/175C oven directly from frozen.
Variations:
I really like this filling on its own – no pastry required! It is a good side dish for any kind of sautéed or baked fish. My favorite is a bowl of roasted vegetable quinoa topped with a portion of pan-fried salmon and showered with more fresh basil.
The bowl concept could be converted back into pies – fish and roast vegetable pasties anyone? Proceed with the recipe as above but, when constructing the little pies, lovingly place a 30g/1oz filet of raw, seasoned salmon on top of the vegetable filling in each pastry. Then encase in dough and bake for a flaky, coral-pink surprise in each bite.
The quinoa may be replaced by any grain that you prefer. The large, chewy Israeli couscous is super good as a substitution.


Meat Pies.
Makes 16 pies.
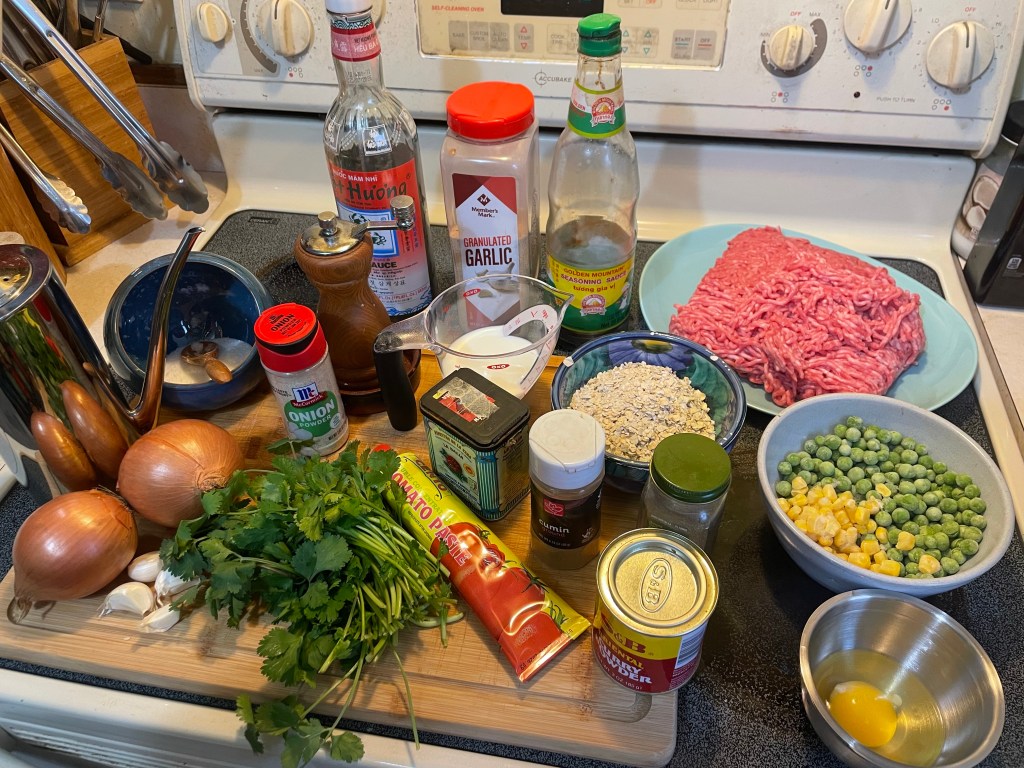
Ingredients:
1 batch basic flaky pastry
450g/1lb ground beef, 80%/20% lean (I will often switch out the beef for a “meatloaf mixture”: that is ground pork, veal, and beef, or for a 1:1 mixture of ground pork and ground turkey or for ground lamb – feel free to experiment with the flavors that you like and what is available)
30ml/1 tblsp neutral oil
10g/2tsp kosher salt
Freshly ground black pepper to taste
65ml/1/4 cup milk
45g/1/2 cup uncooked oats or equivalent amount of starchy thickener (e.g 1 stale bread roll or 1 handful fresh or dry bread crumbs)
1 medium yellow onion, peeled and finely chopped
2-3 medium garlic cloves, peeled and minced
30ml/1tblsp tomato paste
15ml/1/2 tblsp Golden Mountain Seasoning sauce or Maggi
5g/1tsp onion powder
5g/1tsp garlic powder
2.5g/1/2tsp smoked paprika
2.5g/1/2tsp ground cumin
15g/1/2tblsp ground coriander
5g/1tsp mild-medium heat curry powder
45g/1/4 cup frozen peas
45g/1/4 cup frozen corn
15ml/1/2tblsp fish sauce
10g/1/2 cup fresh cilantro, finely chopped
1 raw egg
Method:
For the Filling:
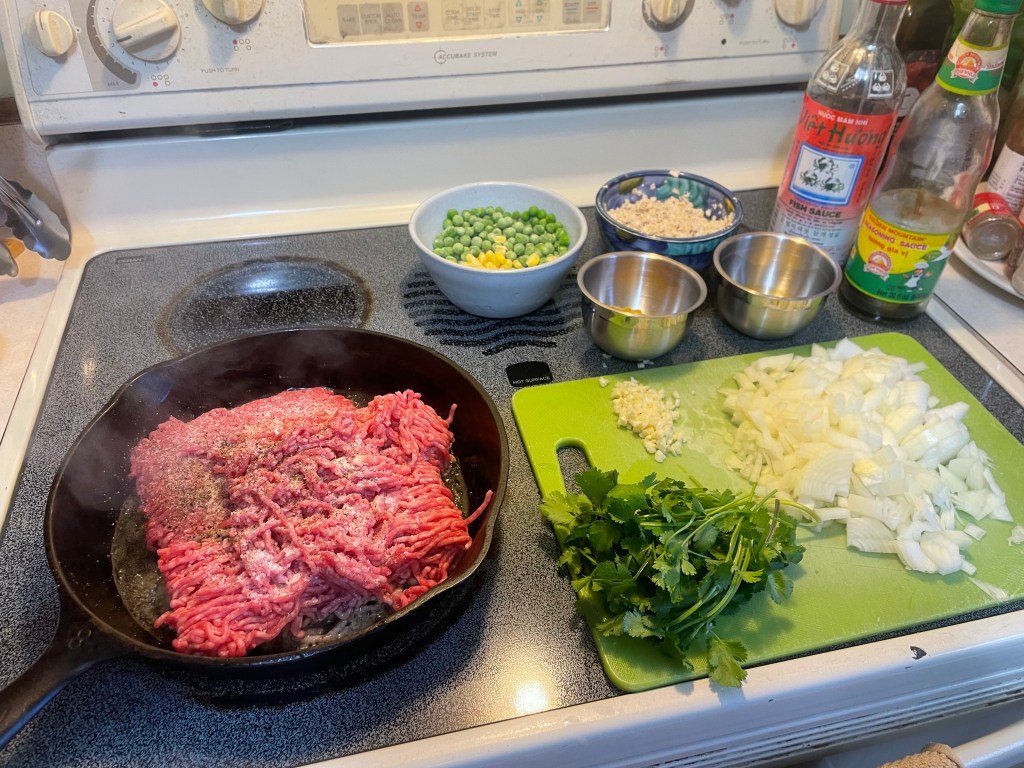
- Heat up a large frying pan (I like my 8 inch cast iron for this) over medium-high heat. Add neutral oil and, when rippling and just starting to smoke, add the ground beef to the pan. Season with salt and pepper and then push and scrape the meat around until any clumps are broken up.
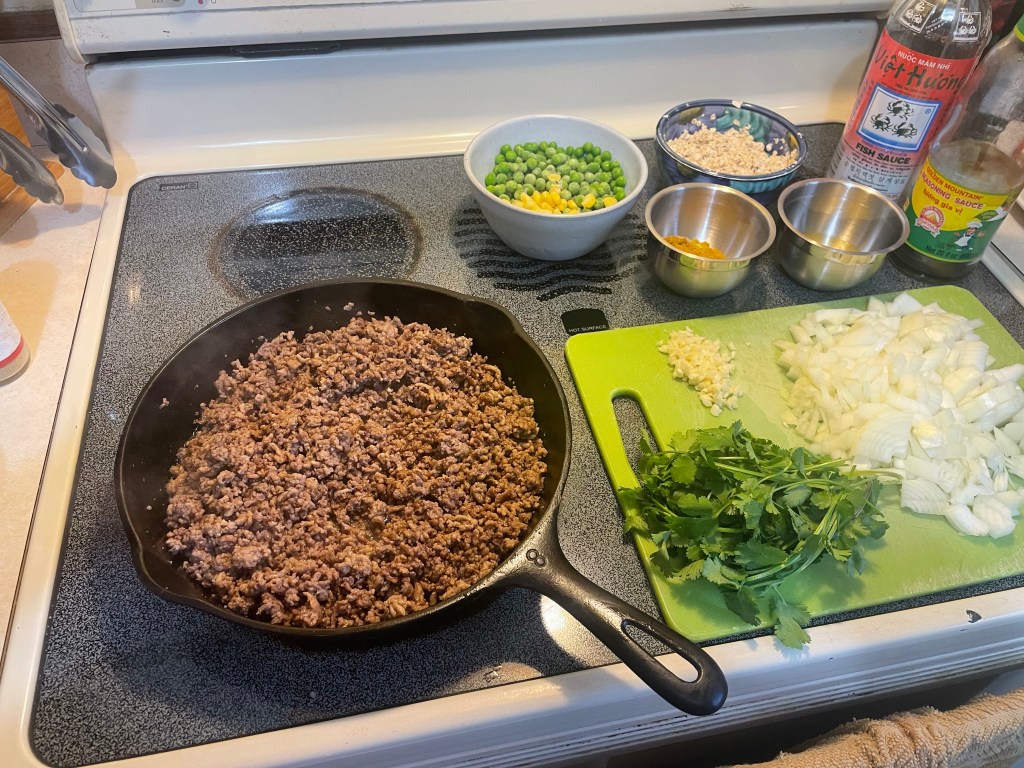
- Continue to fry until no pink, uncooked beef remains and until the meat is starting to brown a little and smell appetizingly…meaty. The goal here is to drive off excess moisture and allow some crunchy bits to form. This will not only add great flavor and texture to your pie, but will keep the filling on the dry side. Avoiding the dreaded soggy pastry bottom. So be patient with the meat. Cook it down to the point where it no longer sounds sloppy as it simmers but makes a more aggressive frying noise. The sound should resemble angry, skittering little legs running over the pan at you (sorry: this is an adventurers’ recipe, after all). When you part the frying meat with your spoon, you should see nice clear grease that you are sautéing in. Not a stew of murky meat juice. When you have achieved this happy state, the meat will start to brown. When it is dry and crisping up around the edges, take the pan off the heat. Using a slotted spoon or spatula, remove the cooked meat into a bowl, leaving the fat and any crispy adhered bits in the pan.
- Now is the time for an honest appraisal of the fat left in your pan. Depending on the type of meat you used, you may need to subtract or add some grease. You want a sensible amount left in your pan to fry your onions. You do not want them dry and sticking to everything, but neither should the onions be drowning in fat. You are not deep frying. So carefully pour off all but approximately 30ml/1tblsp of fat into a heat-proof bowl. If you have the patience, wait it at least several minutes to decant your fat so you are at slightly less risk of suffering grease-splatter burns. I have no patience. Instead, I have many little burn scars on my arms. The fat you pour off can be reserved for cooking (tasty, meaty fat…) or discarded at this point.
- While you cook your meat and wait for your pan to be less blisteringly hot, put the oats in a small bowl with milk to cover. Allow to soak and soften for at least 5 minutes.
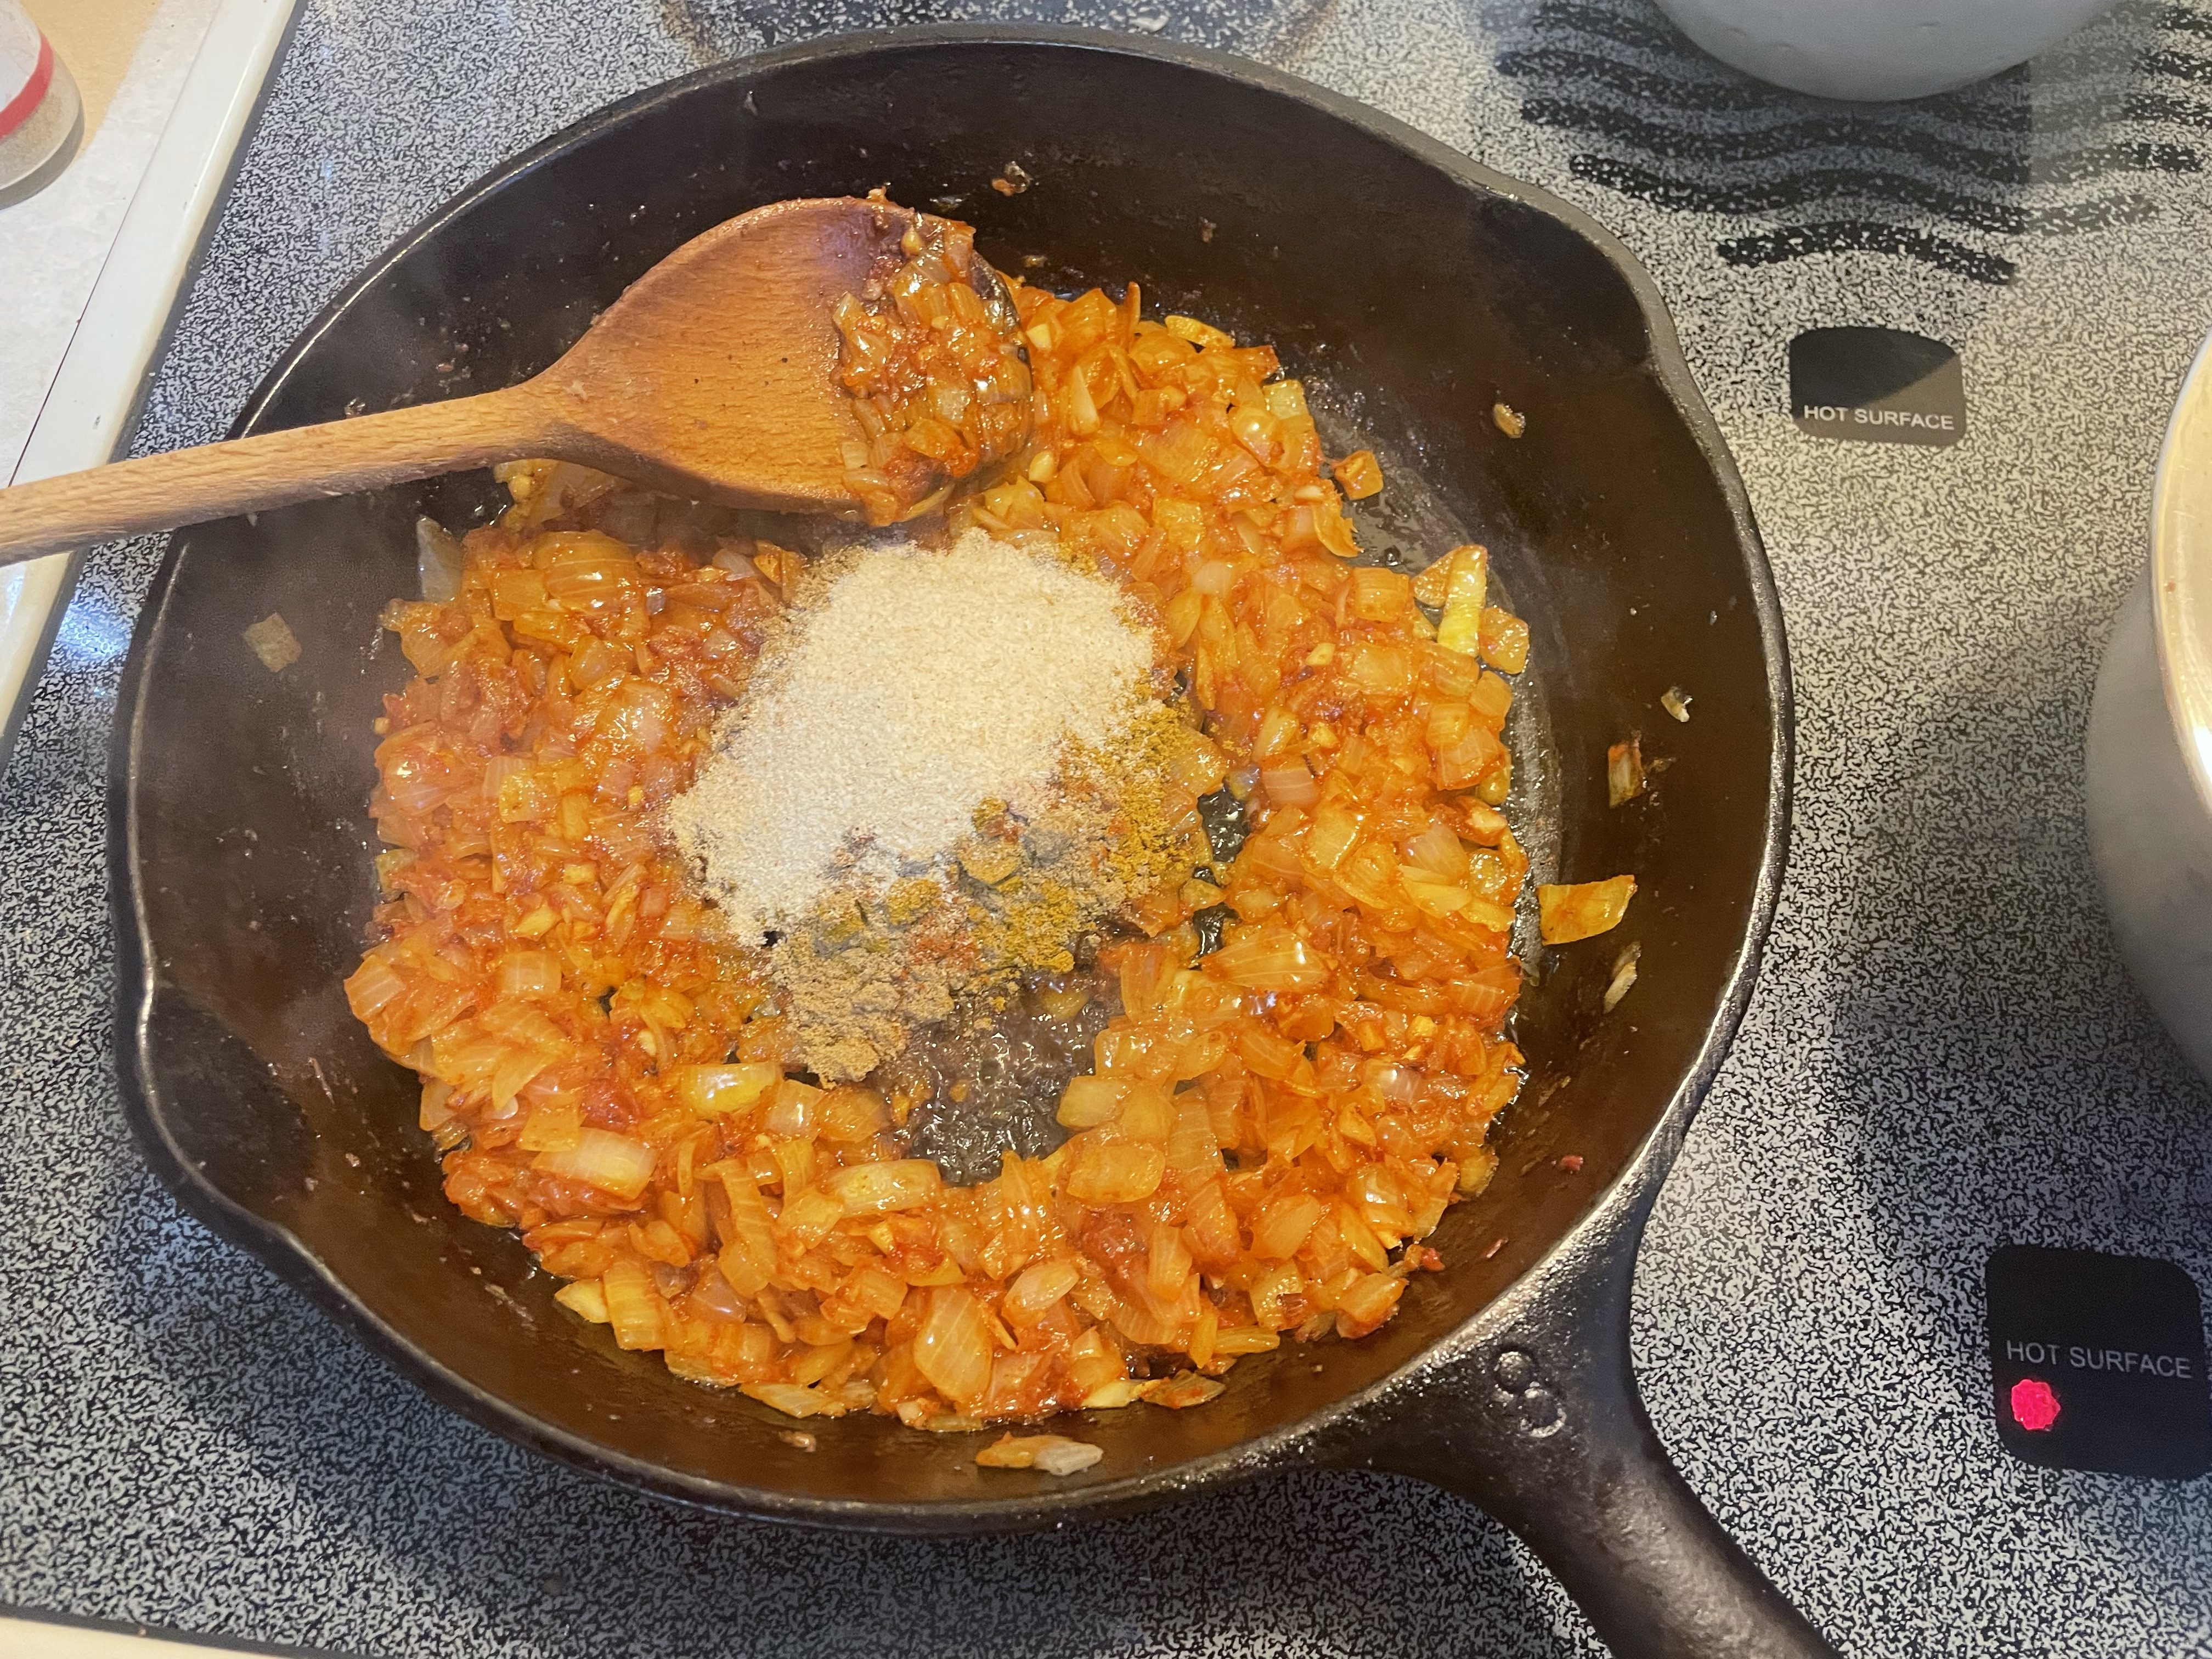
- Return your pan to the heat, on medium, and add the chopped onions. Fry until glassy, golden, and starting to brown. Add garlic and stir through until fragrant, 1-2 more minutes.
- Scrape the tomato paste into the pan and stir frequently. Allow the paste to cook until the gorgeously fiery oil starts to separate from the crimson tomato mass. Then add seasoning sauce, onion powder, garlic powder, paprika, cumin powder, coriander, and curry powder and stir all of that together.
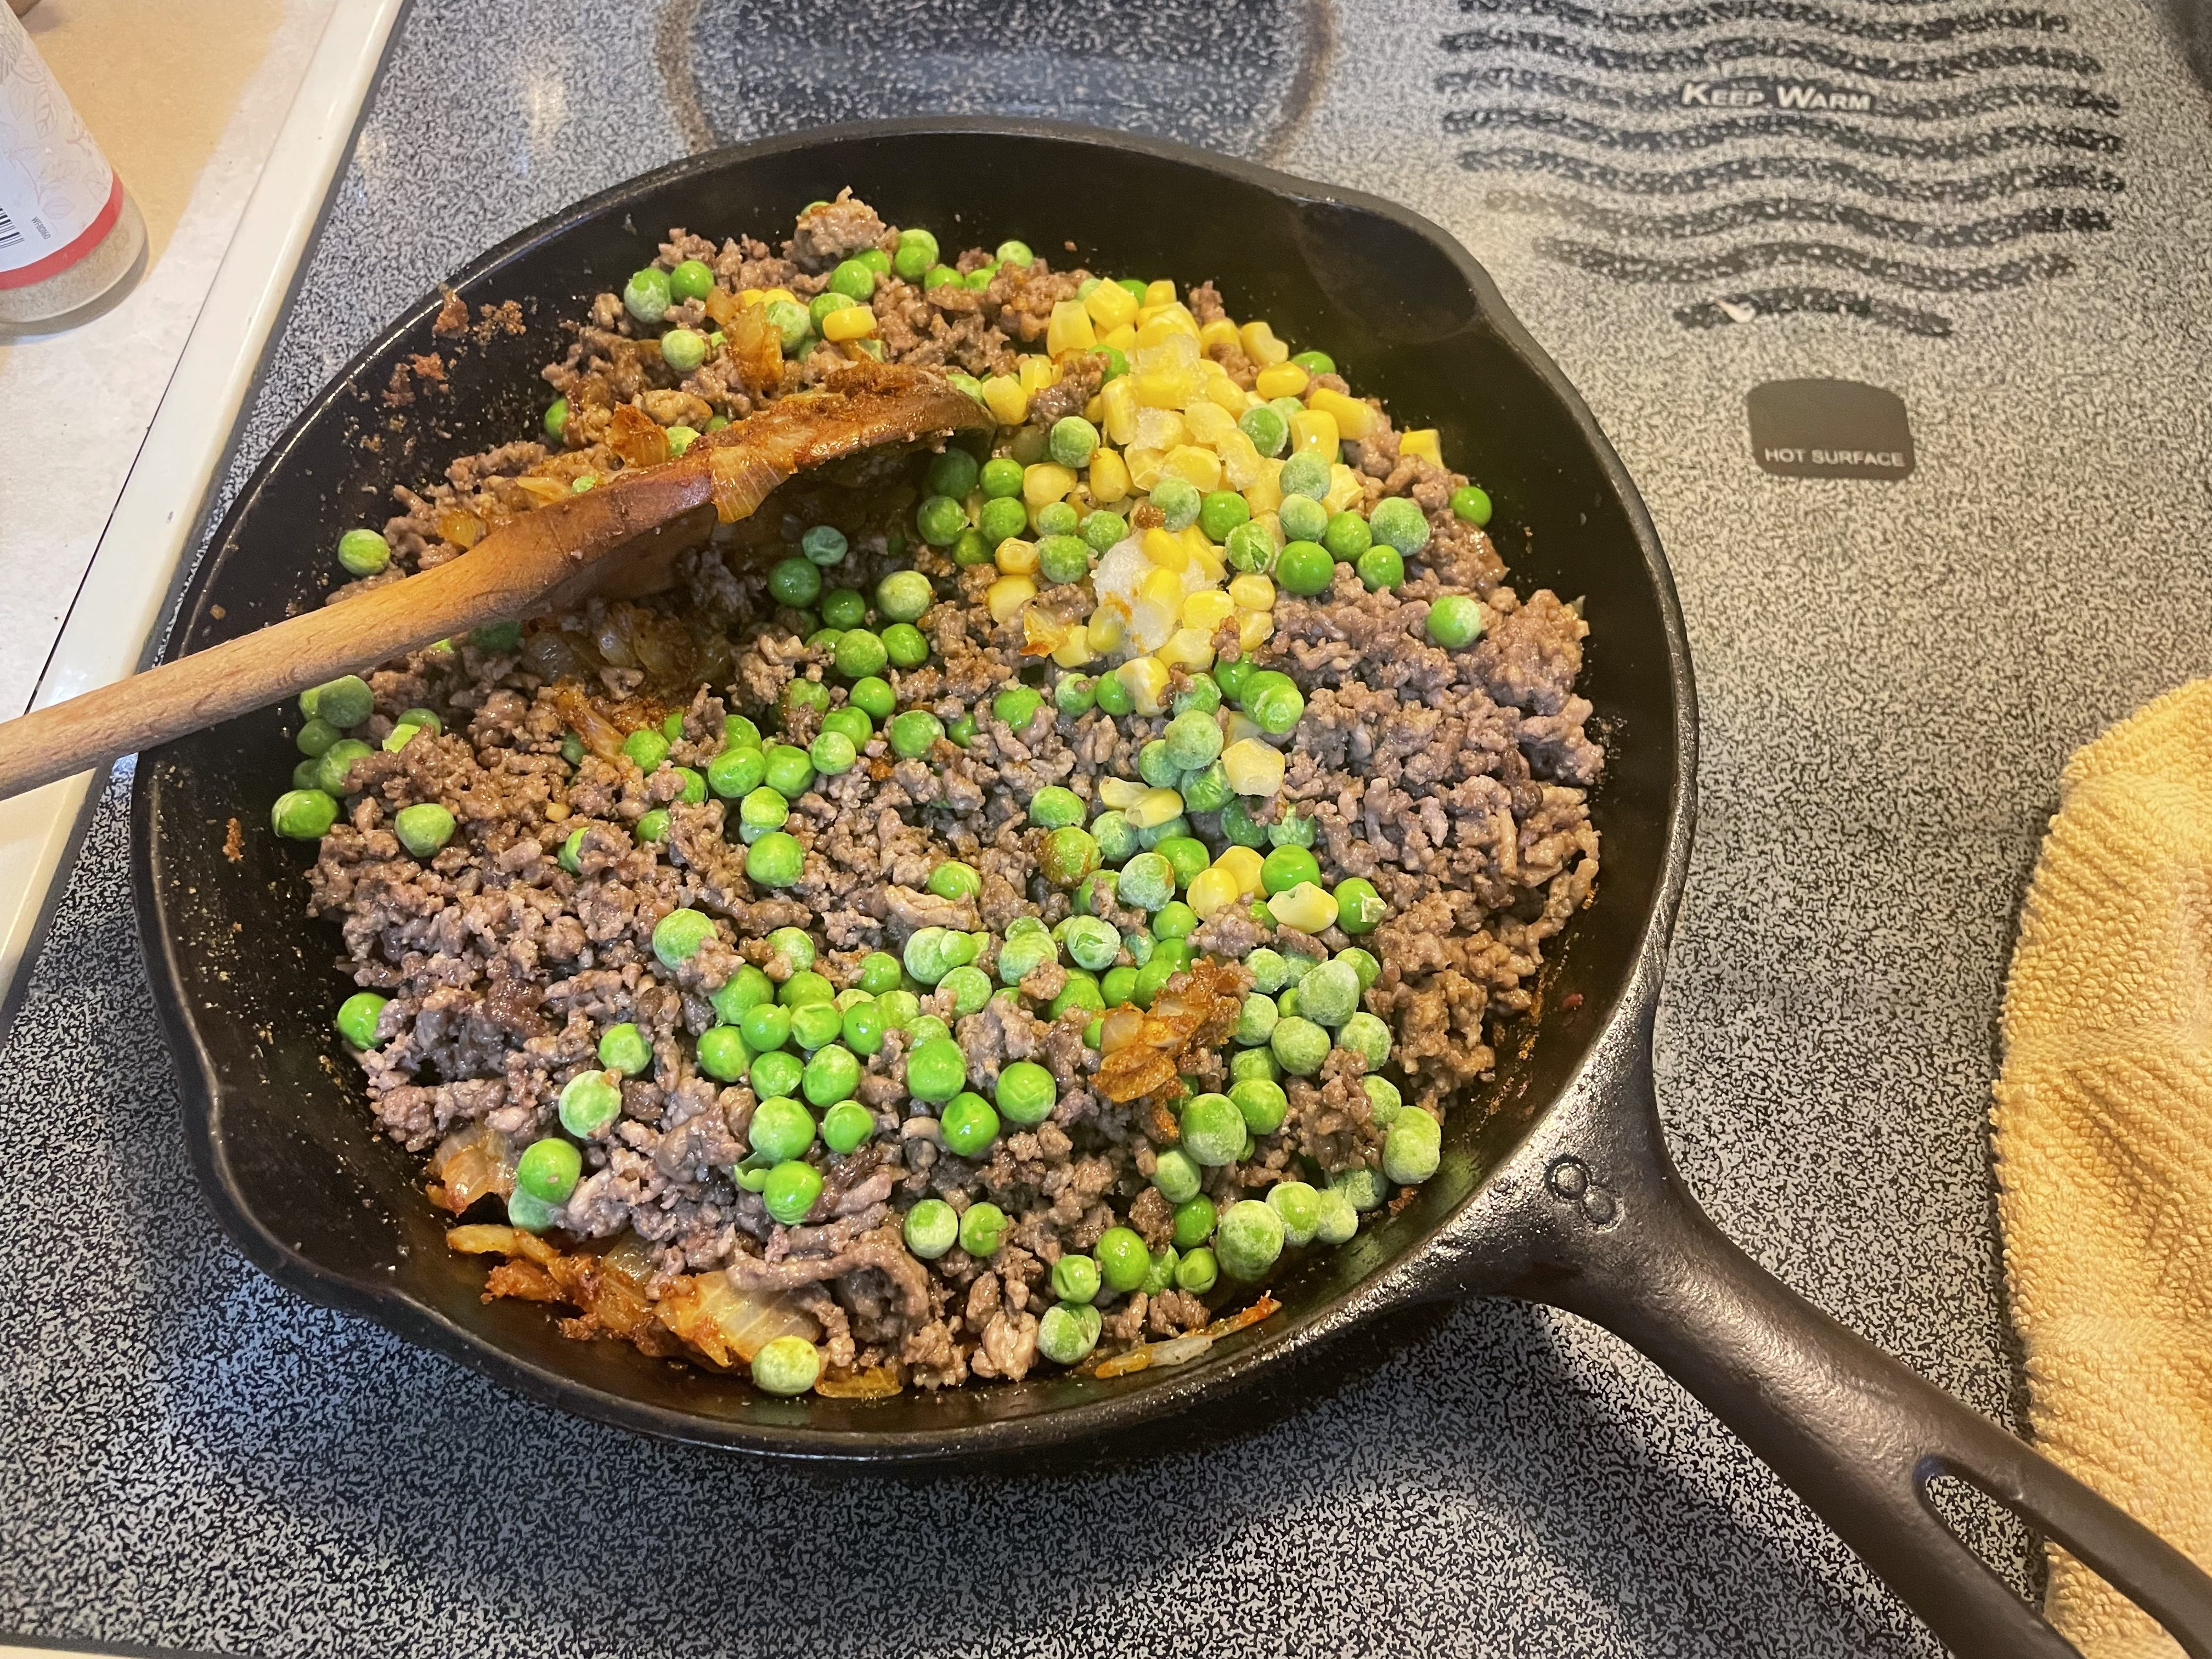
- Return the browned beef to the pan and add the peas and corn. Allow everything to cook together for another 3-5 minutes, stirring often. I have an electric stove that responds in very desultory fashion to my orders to change temperature. So I will usually just turn off my burner at this point and allow the residual heat in the pan to soften the corn and peas .
- Remove the spiced meat and vegetables from the heat and transfer to a large bowl. Mix in fish sauce and chopped cilantro. Add your soaked oats. They will have absorbed all of the milk and should transfer easily to your filling with a satisfying gloopy sound. Allow the mixture to cool until it is gently warm enough not to immediately cook your egg. Taste once more and adjust seasoning if needed.
- Add the raw egg into the bowl
- Mix the filling thoroughly and use immediately or store, covered, in the refrigerator for up to 1 day.
For the pies:
- When ready to bake, pre-heat your oven to 425F/220C. Remove your pastry from the fridge and allow to sit on your kitchen counter/table for about 10 minutes. Just until pliable enough to work with but still cool to the touch.
- Either lightly flour your kitchen counter or (my preferred method because: lazy) put your pastry on a large sheet of parchment paper to roll out.
- Roll out the pastry until it is uniformly quite thin – about 0.5cm/1/4 inch thickness. I like to use a 12.75cm/5inch diameter round cutter to cut out my pastry circles. But it really depends on what size and shape you prefer for your pies: feel free to use a small round guide/cookie cutter or to hand cut square shapes and fill those.
- Place about 60g/2tblsp of filling in the center of each circle, fold the pastry over the filling to form a half-moon shape, and then pinch the pastry edges firmly to close. You can use a little water to moisten the edges before you press them together if you are worried about a good seal forming. But this pastry tends to stick well to itself even without this trick. After sealing the pastry edge, I usually pinch it into multiple little crimps. It looks pretty and it also serves to close the pie more securely. I do re-roll my pastry fragments to cut out more circles. This is such a buttery dough that I have not noted any increase in toughness when I do this. And I do not like to waste my scraps.
- Place the formed pies on two baking sheets lined with parchment paper. Brush with egg wash (1 egg beaten with a splash of cold water) and, if desired, sprinkle the tops with sea salt or nigella seeds.
- Bake in the top and middle 1/3 of your oven for 30 minutes until the pastry is crisp and golden. Allow to cool for at least 15 minutes before enjoying. Be watchful – my oven is very elderly and decrepit. You may nod need the full 30 minutes of baking time. Start checking after 20-25 minutes.
- These pies are most delicious fresh from the oven but are also very nice when served at room temperature or cold. They can be stored in the refrigerator for 3-4 days, or, tightly wrapped after baking, can be frozen for 3 months. Reheat in a 350F/175C oven directly from frozen.
Variations: In addition to changing up the type of meat in the filling, feel free to add or vary the vegetables too. Sliced red pepper makes a nice addition, leave out the peas if you do not like those, add different herbs if you prefer…
One version that I really like contains finely diced sweet potatoes. I add those in to the spiced onions and cook them down before I return the browned meat to the pan. When chopped small enough, the sweet potatoes melt into the meaty mix as it simmers away. Flavoring and thickening it very nicely. In that version, no additional starchy filler or binder is needed – do not add the oatmeal.


Leave a comment